
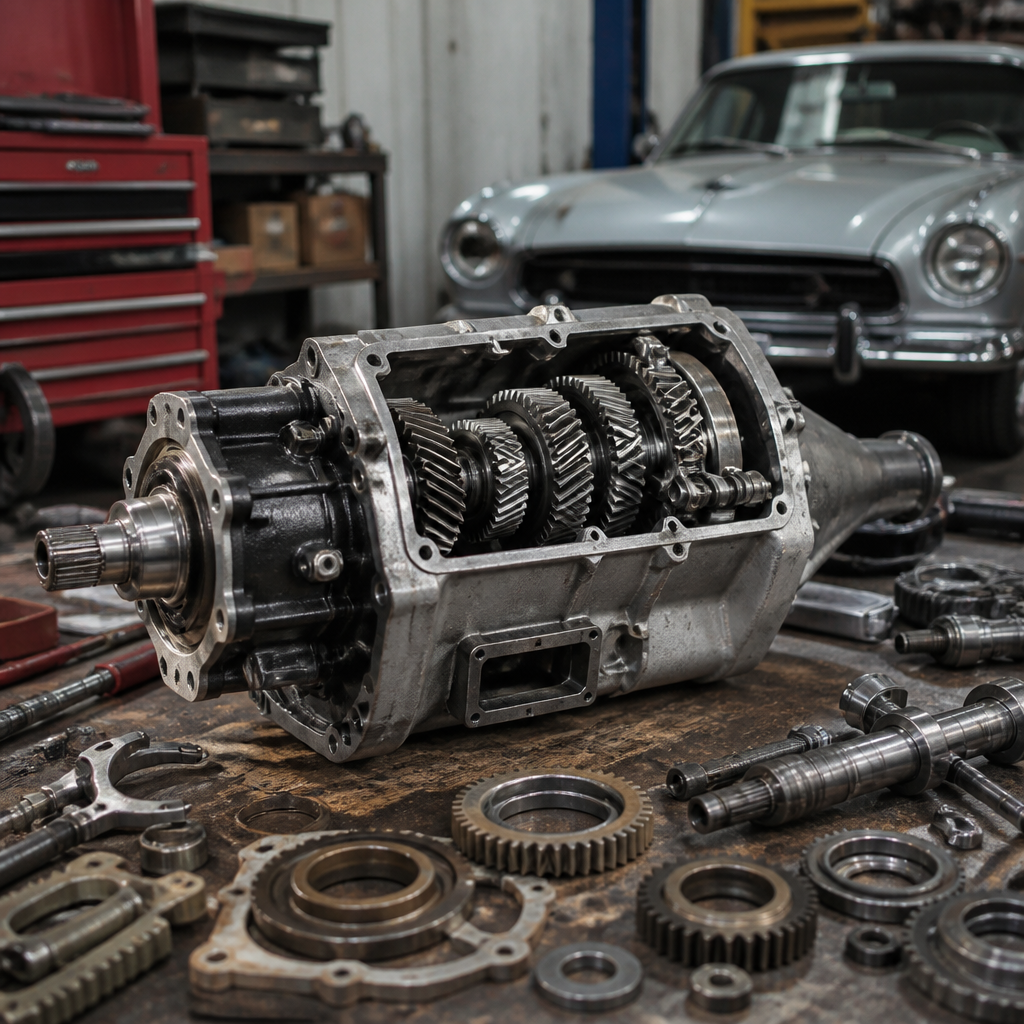
Restoring a classic car transmission is one of the most consequential jobs in any vintage vehicle project because the gearbox determines how power reaches the road, how the car feels at every speed, and whether the finished restoration is dependable or merely decorative. In practical terms, transmission restoration means diagnosing wear, disassembling and cleaning components, measuring hard parts against factory tolerances, replacing failed friction and sealing elements, and reassembling the unit so it performs as intended. In the classic car world, that may involve a column-shift three-speed manual, a Borg-Warner overdrive, a Muncie four-speed, a Chrysler TorqueFlite, a Ford C4, a GM Turbo Hydra-Matic, or another period-correct design. Each has unique service procedures, but the restoration principles remain consistent: preserve what can be saved, replace what cannot, and verify every adjustment before installation.
This topic sits at the center of engine and mechanical work because the transmission does not operate in isolation. A poor idle, incorrect ignition timing, a dragging clutch, a misaligned driveshaft, contaminated cooling lines, or a worn differential can mimic transmission trouble or quickly ruin a fresh rebuild. I have seen owners blame a slipping automatic when the actual fault was low vacuum from an improperly tuned carbureted V8, and I have seen noisy manual gearboxes cured only after replacing the pilot bushing and correcting bellhousing runout. That interconnected reality is why a transmission hub page must cover more than gears and clutches alone. It should help readers understand the full drivetrain system, common failure patterns, restoration decisions, and the supporting service tasks that make a rebuild last.
For anyone restoring a classic driver, weekend cruiser, or judged show car, getting the transmission right matters for authenticity, safety, resale value, and driving enjoyment. A correct shifter feel, proper shift timing, leak-free seals, and stable operating temperatures can transform a car from stressful to confidence inspiring. Just as important, informed restoration prevents expensive mistakes such as reusing a scored pump, installing incorrect friction materials, or filling a manual box with the wrong lubricant chemistry. The sections below explain how to restore a classic car transmission, how that work connects to broader engine and mechanical restoration, and which related tasks deserve attention before the vehicle returns to the road.
Start with Diagnosis Before Any Transmission Rebuild
The first step in classic car transmission restoration is diagnosis, not disassembly. Before removing anything, document symptoms in detail: slipping in specific gears, delayed engagement, grinding on downshifts, popping out of gear, fluid discoloration, vibration under load, or whining that changes with vehicle speed. Road-test notes are valuable because many faults reveal themselves only when the drivetrain is hot and loaded. On automatics, check fluid level and condition, throttle or kickdown linkage adjustment, modulator function where applicable, vacuum integrity, cooler flow, and line pressure against service-manual specifications. On manuals, inspect clutch free play, hydraulic travel or mechanical linkage wear, shifter bushings, engine and transmission mounts, and driveshaft universal joints.
Factory shop manuals are not optional reference material; they are the standard. They provide endplay values, band adjustments, clutch clearances, torque specs, selective washer dimensions, and hydraulic test procedures that aftermarket summaries often omit. For older units, an ATSG manual, Motors manual, or original dealership literature can save hours and prevent irreversible assembly errors. In my own work, I always tag external components, photograph linkage routing, and measure before teardown because many classic cars have been modified over decades. You may find a non-original converter, aftermarket shifter, swapped rear axle ratio, or mixed-year case and tailhousing combination. If you rebuild without identifying those variables, you risk solving the wrong problem.
Manual and Automatic Transmissions Fail Differently
Classic manual transmissions usually fail from synchronizer wear, chipped gear teeth, worn bearings, countershaft or cluster gear damage, inadequate lubrication, or abuse from aggressive shifting. A gearbox that grinds on the 2-3 shift often points to worn blocker rings, but it can also indicate excessive input shaft play, warped clutch components, or clutch drag. Many older three-speeds and four-speeds survive surprisingly well internally yet develop chronic leaks from hardened seals and worn yokes. By contrast, classic automatics typically fail through friction material wear, hardened lip seals, scored pump surfaces, valve body contamination, servo leakage, bushing wear, and band or clutch pack misadjustment. Heat is the silent killer in automatics; dark fluid and varnish tell a story of overheating that no cosmetic restoration can hide.
Understanding the failure mode affects parts ordering and machining decisions. A Muncie with a damaged cluster gear may need hard-part sourcing from a specialist, while a TH350 with soft shifts may need a complete friction, steel, bushing, and seal refresh plus pump inspection. Some units, including early Hydra-Matics and overdrive manuals, demand specialized knowledge because their adjustment procedures and parts availability differ from more common later transmissions. This is why engine and mechanical work in a restoration plan should include an honest assessment of your own capability. There is no shame in outsourcing planetary geartrain inspection, gear tooth pattern analysis, or torque converter rebuilding to established transmission shops that work specifically on vintage units.
Disassembly, Cleaning, Inspection, and Measurement
Once the transmission is removed, clean the exterior thoroughly before opening the case. Dirt introduced during teardown can contaminate valves, bearings, and synchro surfaces. I use a strict bench routine: drain and inspect fluid for metal, cut open the filter on automatics when practical, separate parts by subassembly, and compare every hard part to exploded diagrams. Cleaning is not simply degreasing. Valve bodies need lint-free handling, clutch drums need groove inspection, and manual gears require close examination for pitting, galling, and thrust surface wear. Cases should be checked for cracks around mounting points, servo bores, and extension housings. On automatics, bushing fit, pump body scoring, converter hub wear, and clutch drum splines deserve special attention because they often determine whether a rebuild truly lasts.
Measurement is where professional results are won. Use feeler gauges, dial indicators, micrometers, snap gauges, and straightedges as the factory procedure requires. Check gear backlash where specified, shaft endplay, clutch pack clearance, band condition, synchro ring-to-cone clearance, and input shaft runout. Bellhousing alignment on manual cars is often overlooked, yet excessive runout can destroy pilot bushings and cause shifting complaints after a seemingly perfect rebuild. If the transmission mates to an engine that has already been rebuilt, verify crankshaft pilot bore condition and crank endplay before reinstallation. Restoring a classic car transmission means restoring tolerances, not simply replacing visible wear items. Any shop that skips measurement is assembling parts, not rebuilding a gearbox.
Core Components, Typical Problems, and Recommended Actions
The most efficient way to plan engine and mechanical work is to connect common symptoms to the likely component group and the standard corrective action. The table below reflects patterns I routinely see in classic transmission restoration projects.
| Component or System | Common Classic-Car Symptom | What Usually Causes It | Restoration Action |
|---|---|---|---|
| Synchronizers and blocker rings | Grinding during upshifts | Worn friction surfaces, clutch drag, shaft play | Replace rings, inspect hubs, verify clutch release and endplay |
| Bearings and bushings | Whine, rumble, metal in lubricant | Lubrication breakdown, age, contamination | Replace all suspect rolling elements and measure fit in case |
| Clutch packs and bands | Slip, flare, delayed engagement | Heat damage, hardened seals, poor adjustment | Install new frictions and steels, set clearances and band preload |
| Valve body and governor | Harsh, late, or erratic shifts | Debris, varnish, sticking valves, pressure faults | Disassemble carefully, clean passages, test springs and valves |
| Seals and gaskets | Persistent leaks | Age hardening, yoke wear, venting issues | Replace sealing elements and repair mating surfaces |
| Torque converter or clutch assembly | Shudder, poor launch, vibration | Internal converter failure, warped disc, pilot issues | Rebuild or replace converter; resurface or renew clutch parts |
Related Engine and Mechanical Work That Supports Transmission Reliability
A transmission rebuild is only one part of a dependable drivetrain restoration. On manual cars, inspect the flywheel for cracks and heat checking, resurface it to the correct finish, replace the pilot bushing or bearing, inspect the release fork and pivot, and renew the clutch disc, pressure plate, and release bearing unless they are verified recent and high quality. Check mechanical linkage wear at every pin and bushing or rebuild the hydraulic system with fresh hoses, master cylinder seals, and slave cylinder components. On automatics, flush or replace cooler lines, verify radiator cooler integrity, inspect the flexplate for cracks around the crank flange, and confirm converter spacing. A contaminated cooler can send debris straight into a fresh transmission within minutes.
Engine tune is just as important. Vacuum-modulated automatics depend on stable manifold vacuum and proper ignition timing to shift correctly. Carburetor calibration affects idle quality and off-idle load, which influences engagement feel. Excessive engine movement from collapsed mounts can bind linkage or create driveshaft angle issues that feel like transmission shudder. While the gearbox is out, inspect the rear main seal area, oil pan seepage, starter ring gear teeth, exhaust routing clearance, and frame crossmember bushings. This is also the best time to evaluate the driveshaft: check balance, inspect slip-yoke wear, replace universal joints, and verify pinion angle if the car has altered suspension ride height. Good transmission restoration always includes these neighboring systems because comebacks rarely originate from one isolated part.
Parts Selection, Originality, and Modern Upgrades
Choosing parts for a classic car transmission restoration involves balancing authenticity, durability, and intended use. For a concours restoration, date-correct castings, original gear ratios, and factory shift feel may take priority over performance enhancements. For a car that will see highway miles, modern friction materials, improved sealing compounds, stronger bands, or an overdrive conversion may be the better choice. I generally recommend OEM-quality or specialist-sourced rebuild kits from established suppliers rather than unknown budget kits. The difference often shows up in friction plate consistency, gasket fit, bushing metallurgy, and seal material. Brands matter less than supplier reputation, documented compatibility, and whether the kit matches the exact transmission code and year range.
Some upgrades are sensible even for period-sensitive builds. A larger transmission cooler on an automatic driver, where visually discreet, can dramatically reduce heat stress. Improved synchronizer materials may enhance shift quality without changing appearance. Hardened intermediate sprags, revised servos, and updated thrust bearings can address known weak points in specific units such as the GM 700-R4 or Ford AOD, though those are later than many traditional classics. For older transmissions, the smarter upgrade is often precision, not modification: proper endplay, true sealing surfaces, correct lubricant, and accurate linkage adjustment. If you do choose a non-original shifter, shift kit, gearset, or overdrive add-on, document every change. Future tuning, parts ordering, and troubleshooting become much easier when the car’s mechanical history is clear.
Reassembly, Installation, Break-In, and Long-Term Maintenance
Reassembly should follow a disciplined sequence with constant lubrication, cleanliness, and verification at each stage. Pre-lube bushings, thrust surfaces, and bearings with the correct assembly lube or transmission fluid. Air-check clutch circuits on automatics before final assembly. Verify torque values, selective fit choices, band settings, and endplay more than once. On manuals, confirm synchro orientation, fork alignment, and detent operation before the case is sealed. During installation, never force the transmission into place with bellhousing bolts; the unit must seat naturally with the converter fully engaged on automatics and the clutch disc correctly aligned on manuals. Once installed, fill with the exact fluid or gear oil specified for the design. Yellow-metal compatibility matters in older manual gearboxes, so not every modern gear lubricant is safe for brass synchronizers.
Break-in is straightforward but important. Initial driving should confirm line pressure behavior, shift timing, clutch release, leak-free operation, and driveline smoothness before any hard acceleration. Recheck fluid level hot on automatics and inspect for seepage after several heat cycles. A freshly restored classic car transmission benefits from early follow-up: linkage adjustment, pan bolt inspection where appropriate, and another look at mount hardware, cooler fittings, and driveshaft fasteners. Long-term maintenance is simple but often neglected. Change fluid at sensible intervals, keep the engine properly tuned, fix leaks early, avoid overheating, and investigate any new vibration or shift change immediately. When transmission restoration is handled as part of complete engine and mechanical work, the reward is not just a functioning gearbox. It is a classic car that starts, moves, shifts, and cruises with the confidence its original engineers intended. If you are planning a restoration, use this hub as your roadmap, inspect the whole drivetrain, and rebuild the transmission with precision rather than guesswork.
Frequently Asked Questions
What does restoring a classic car transmission actually involve?
Restoring a classic car transmission is much more than swapping a few worn parts and sealing it back up. A proper restoration begins with diagnosis: identifying how the transmission behaved before removal, including slipping, grinding, delayed engagement, fluid leaks, unusual noise, or harsh shifting. From there, the unit is carefully disassembled so each internal component can be inspected in sequence. In a manual transmission, that usually means evaluating gears, synchronizers, shafts, bearings, thrust surfaces, and shift forks. In an automatic, the process is more complex and often includes inspecting clutch packs, bands, bushings, valve bodies, pumps, servos, sealing rings, and internal passages.
After teardown, every reusable part should be thoroughly cleaned and measured against factory service specifications. This is one of the most important steps because many classic transmission problems come from accumulated wear that is not always visible at a glance. Gear teeth may look acceptable but have pitting or abnormal contact patterns. Shafts may show slight wear that affects endplay. A valve body may contain varnish or debris that disrupts hydraulic pressure. A proper restoration also includes replacing consumable items such as gaskets, seals, O-rings, friction materials, bearings, and bushings, while determining whether hard parts can be reused, refinished, or must be replaced.
Reassembly is a precision job. Clearances, preload, endplay, torque values, and alignment all matter. Once assembled, the transmission should be tested for smooth operation before installation whenever possible. In short, restoration is about returning the gearbox to reliable operating condition, not simply making it look clean. The goal is to preserve the original driving character of the vehicle while ensuring that the transmission can handle real-world use with consistency and dependability.
How can you tell whether a classic car transmission needs a full rebuild or just minor repair?
The difference between a minor repair and a full rebuild usually comes down to the extent of internal wear, contamination, and age. External issues such as a leaking pan gasket, a worn shifter bushing, an output seal leak, or an adjustment problem can sometimes be corrected without complete disassembly. Likewise, a clutch linkage issue on a manual-transmission car may mimic gearbox trouble even though the transmission itself is still mechanically sound. That is why accurate diagnosis is essential before any restoration plan is made.
However, many classic car transmissions that have been in service for decades benefit from a full rebuild, even if they still function. Symptoms such as slipping under load, popping out of gear, noisy bearings, difficult shifting, delayed automatic engagement, burnt transmission fluid, or metal contamination in the oil usually point to deeper internal problems. Age alone is also a major factor. Rubber seals harden, friction materials break down, bushings wear, and tolerances drift over time. In vintage vehicles, long periods of storage can be just as damaging as heavy use because moisture, old fluid, and corrosion can affect internal parts.
A full teardown is often the only reliable way to know what condition the internal components are truly in. If the transmission is already out of the vehicle during a restoration, many builders choose a comprehensive rebuild rather than risk reinstalling a questionable unit. That approach is usually more cost-effective in the long run because it avoids repeated labor, reduces the chance of failure after the car is finished, and helps ensure the transmission performs as confidently as the rest of the restoration. When originality, drivability, and long-term reliability all matter, rebuilding is often the smart choice.
Should you keep the original transmission parts whenever possible, or replace them with modern components?
In most classic car transmission restorations, the best approach is a balanced one: preserve what is structurally sound and historically important, but replace anything that compromises reliability, safety, or performance. Original hard parts such as the main case, gearsets, tail housing, shafts, and linkages are often worth retaining if they remain within factory tolerances and show no critical damage. Keeping these parts helps maintain the authenticity of the vehicle and, in many cases, preserves the original feel of the drivetrain.
That said, consumable and wear-prone components should almost always be replaced during a proper restoration. Bearings, bushings, seals, synchronizer rings, clutch discs, steels, bands, thrust washers, and gaskets are not items to preserve for originality if they are degraded. In fact, many modern replacement materials outperform the originals in durability and fluid resistance while still allowing the transmission to operate as intended. Some upgraded friction materials, sealing compounds, and bearing designs can significantly improve service life without changing the basic character of the transmission.
The key is to avoid blindly mixing aftermarket upgrades into a transmission that was engineered for a specific application. Not every modern part is automatically better, and not every “performance” kit suits a stock classic car. The right decision depends on how the vehicle will be used. A concours restoration may prioritize original specifications and factory-correct internals wherever practical. A driver-quality restoration may benefit from discreet improvements that increase dependability on modern roads. The best restorations respect the original engineering while making thoughtful choices about replacement parts based on function, compatibility, and intended use.
What are the most common mistakes people make when restoring a classic car transmission?
One of the most common mistakes is assuming that a transmission can be rebuilt successfully without the correct service information, measuring tools, and assembly procedures. Classic transmissions are highly sensitive to clearances, endplay, lubrication paths, and component order. Even experienced hobbyists can run into trouble if they rely on memory, guesswork, or generic instructions. Skipping detailed inspection and simply installing a “rebuild kit” is another frequent error. Kits are useful, but they do not correct worn hard parts, damaged bores, warped clutch drums, or out-of-spec shafts.
Cleaning is another area where restorations often fail. Any debris left behind inside the case, valve body, bearings, or oil passages can quickly ruin fresh components. In automatic transmissions especially, even small contamination can cause pressure loss, sticking valves, or premature clutch failure. Reusing questionable fasteners, failing to inspect the cooler and lines for contamination, and ignoring related systems such as the clutch, torque converter, mounts, linkage, or driveshaft can also undermine the work. A transmission does not operate in isolation, so surrounding components matter.
Perhaps the biggest mistake is prioritizing cosmetics over function. A beautifully painted case means little if the internals were not properly measured and assembled. Another major issue is underestimating how age affects parts that “look fine.” A bushing may appear usable but be worn enough to affect lubrication or shaft stability. A seal may hold pressure on the bench but fail after heat cycling. Successful transmission restoration depends on patience, precision, and discipline. The people who get the best results are the ones who treat the job as a technical rebuild rather than a quick refurbishment.
How do you make sure a restored classic car transmission is reliable once it goes back into the vehicle?
Reliability after restoration depends on more than the internal rebuild itself. First, the transmission must be assembled to specification using quality parts, correct measurements, and proper lubrication during assembly. Endplay, clutch clearances, bearing preload, gear contact, and sealing integrity all need to be verified. If the transmission is automatic, hydraulic circuits, valve body function, and converter condition are equally important. If it is manual, attention should also be paid to the clutch assembly, pilot bearing, release mechanism, and flywheel condition, because problems in those areas can be mistaken for transmission faults.
Installation is the next critical phase. Misalignment, damaged mounts, incorrect driveshaft angles, worn U-joints, poor cooler flow, or improperly adjusted linkage can all affect performance and longevity. Fluid choice matters as well. Many classic transmissions were designed around specific lubricant types, and using the wrong fluid can alter shift quality, synchro performance, or internal lubrication. Initial startup and break-in should be approached methodically. Check for leaks, verify line pressure or clutch operation where applicable, and road test the vehicle under controlled conditions before assuming the job is complete.
Long-term reliability also comes from realistic expectations and regular maintenance. Even a perfectly restored transmission can suffer if paired with an overheated engine, an incorrectly tuned carburetor or throttle linkage, excessive drivetrain vibration, or aggressive use beyond its design limits. The best way to protect your investment is to treat the transmission as part of a complete system. When the unit is rebuilt carefully, installed correctly, matched with healthy supporting components, and maintained with proper fluid and periodic inspections, a restored classic car transmission can deliver years of dependable service while preserving the authentic driving experience that makes vintage cars so rewarding.




