
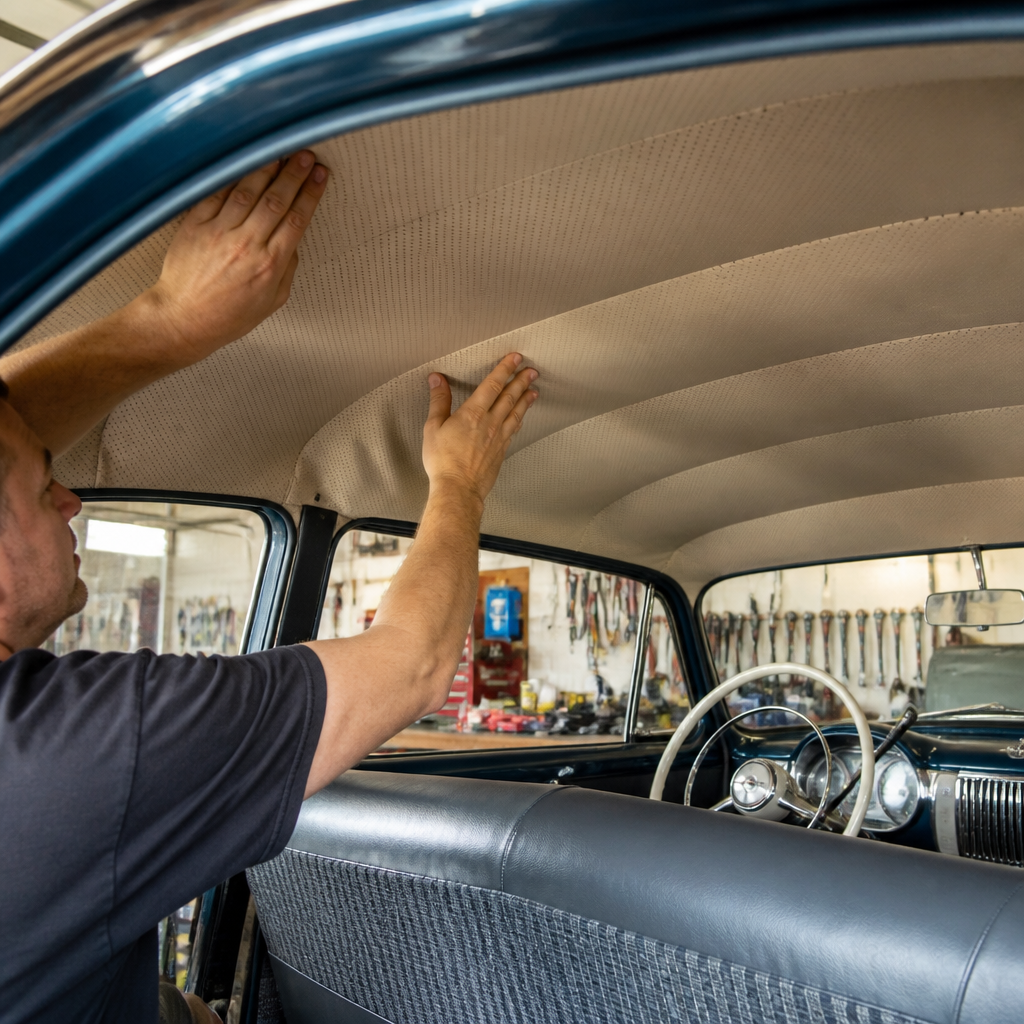
Replacing a headliner in a classic car is one of the most transformative interior restoration jobs you can do, because it changes how the cabin looks, sounds, and even smells the moment the doors close. In classic car restoration, the headliner is the finished material stretched or bonded to the inside roof structure, usually supported by bows, rods, wire listings, backing boards, or adhesive, depending on the vehicle and era. On cars from the 1940s through the 1970s, the headliner often worked with windlace, sail panels, package tray trim, and pillar upholstery as one system, so replacing it correctly means understanding the whole interior, not just the fabric overhead.
I have learned on restorations that a headliner can make an otherwise solid interior feel unfinished if the seams wander, the grain runs the wrong way, or the wrinkles are chased without fixing the real cause. It matters for appearance, but also for originality, resale value, comfort, and long-term durability. A sagging or stained headliner can point to hidden roof leaks, failed window seals, crumbling insulation, or rust around glass channels. That is why this subject belongs at the center of interior restoration. If you can evaluate, remove, prepare, install, and finish a headliner properly, you can approach the rest of the cabin with more confidence and better sequencing.
This hub article explains how to replace headliners in classic cars while also mapping the broader interior restoration work that usually surrounds the job. You will learn the common headliner types, the tools and materials worth buying, how to assess the roof structure before installation, where amateurs lose alignment, and when to repair related parts like sun visors, garnish moldings, dome lights, and insulation. You will also see where this work connects to seat upholstery, carpets, door panels, weatherstripping, and glass removal, because the best classic car interior restoration plans treat the cabin as an integrated assembly rather than a set of isolated tasks.
Know the headliner type before you remove anything
The first rule is simple: identify the construction method before disassembly. Most classic cars use one of three systems. The first is a bow-style sewn headliner, where metal rods pass through stitched sleeves and anchor into roof side structures. This is common on many domestic sedans and coupes from the 1950s and 1960s. The second is a board-style headliner, where fabric is glued to a rigid or semi-rigid panel, often seen in later classics, personal luxury cars, and some imports. The third is a formed vinyl or perforated material attached directly with adhesive around edges and trim points, sometimes with separate sail panels and pillar pieces.
You need to know which system you have because the removal method, material choice, and installation sequence are different. Bow-style headliners rely on rod order, sleeve spacing, and tension from centerline to perimeter. Board-style units depend on substrate integrity; if the board is warped or crumbling, no amount of careful fabric work will save the result. Direct-glue systems are unforgiving about adhesive timing and surface cleanliness. Factory service manuals, Fisher Body manuals for General Motors cars, and marque-specific restoration guides are valuable here because they show trim attachment order and often note differences by body style.
Before touching a screw, photograph every edge, listing rod, overlap, and trim relationship. Label each bow from front to rear because similar-looking rods often differ in length or curvature. I usually mark them with tape and a paint pen, then sketch the order in a notebook. This step saves hours during installation. If your project includes related interior restoration work, create folders for headliner, rear quarter trim, visors, dome light wiring, windshield trim, and rear glass trim. That organization turns this one repair into a strong foundation for the rest of the cabin.
Inspect the hidden structure and solve the cause, not just the symptom
A new headliner installed over unresolved moisture problems will fail early. Once the old material is out, inspect the roof skin from inside for pinholes, previous repairs, seam sealer failures, and rust around front and rear window openings. Check drain paths on vinyl-top cars and inspect the package tray area for evidence of rear glass leaks. Water staining near the quarter windows often means hardened seals, not a bad headliner. Surface rust can usually be cleaned, treated, epoxy primed, and top-coated. Perforation near structural braces or glass channels may require welded patch repair before trim goes back in.
This is also the right time to inspect roof bows, tack strips, listing wires, and insulation. Many older cars used cardboard or fiber tack strips around window openings and sail panel edges. If those strips are brittle, staples or trim clips will not hold consistently. Reproduction tack strips are available for many popular models, and marine-grade alternatives can be fabricated when originals are unobtainable. Replace rotten jute, mouse-damaged insulation, or detached foil-backed sound deadener. Modern butyl sound sheets and closed-cell foam can reduce heat and resonance, but use them sparingly on bow-style roofs so they do not interfere with rod clearance or create bulky edges under trim.
Electrical details are easy to overlook during interior restoration. Test dome light circuits, map lights, and any roof-mounted courtesy lamp switches while access is open. Clean grounds, replace brittle sockets, and verify that the harness is clipped away from rod movement. If the car has shoulder belt mounts in the roof structure, chase the threads and protect them during glue work. Solving these issues before fabric goes in is far easier than reopening the job after the interior is finished.
Choose the correct material, tools, and related trim parts
Material selection affects both authenticity and workability. Common classic headliner materials include perforated vinyl, expanded vinyl, cloth-backed vinyl, mohair-style cloth for earlier luxury cars, and knit-backed foam fabric on later vehicles. Match not just the color but also the grain, perforation pattern, seam layout, and sheen. Suppliers like SMS Auto Fabrics, Acme Auto Headlining, REM Automotive, and marque-specific upholstery vendors often offer model-correct kits. A quality pre-sewn kit is usually worth the cost because seam spacing and sleeve placement are difficult to duplicate accurately at home without patterns.
You do not need every specialty trim tool on the market, but a few are essential: hog ring pliers where applicable, spring clamps, binder clips, a quality heat gun used carefully, upholstery brushes, plastic trim tools, stainless picks, chalk, measuring tape, and sharp shears. For adhesives, use a high-temperature trim adhesive rated for automotive roof temperatures. General spray glue from a craft aisle will let go in summer heat. 3M Headliner and Fabric Adhesive or Landau Top and Trim formulations are common choices, but always verify compatibility with the material backing and substrate. Also stock rust converter if needed, epoxy primer, seam sealer, replacement clips, windlace, and possibly new sail panels.
| Component | What to Check | Replace or Reuse | Why It Matters |
|---|---|---|---|
| Headliner fabric | Correct pattern, color, seam layout | Replace in most restorations | Sets cabin appearance and originality |
| Roof bows | Order, shape, corrosion | Usually reuse | Controls fit and seam alignment |
| Tack strips | Brittleness, missing sections | Replace if weak | Prevents loose edges and trim failure |
| Insulation | Moisture, odor, deterioration | Replace if contaminated | Improves comfort and noise control |
| Glass seals | Hardening, shrinkage, leak paths | Replace when leaking | Protects the new headliner from water damage |
Remove the old headliner methodically and prepare the shell
Headliner removal is really trim disassembly in a precise order. Start by disconnecting the battery if you will be working around lights or pillar wiring. Remove seats if access is tight; the extra room reduces mistakes. Then remove sun visors, mirror, dome light lens and housing, coat hooks, shoulder belt hardware, garnish moldings, pillar trim, sail panels, windlace retainers, and any upper trim panels. Bag hardware by component and location. If the front or rear glass must come out to release edges correctly, plan that early because it affects weatherstrip replacement and scheduling.
As the old headliner comes down, look for factory witness marks. You may see centerline marks, fold lines at sail panels, or old adhesive boundaries that show how far the material wrapped. On bow-style cars, remove one bow at a time and keep each with its position label. If sleeves are torn, compare them to the new kit before discarding. Then clean the roof structure thoroughly. Remove old glue with the appropriate solvent, vacuum debris from braces, treat rust, and smooth any rough welds or burrs that could print through the material.
Preparation determines fit. Dry-fit related trim parts before the new fabric goes in, especially rebuilt garnish moldings, reproduction dome light bases, and replacement tack strips. If you are repainting interior metal, do it now and allow full cure. I also mark the centerline of the windshield opening, rear window opening, and new headliner with chalk. Those references keep the seams from drifting during tensioning. On many classics, one small alignment error at the front becomes a visible inch of skew at the rear sail panels.
Install a bow-style headliner with controlled tension and symmetry
Bow-style installation rewards patience more than force. Insert the bows into the stitched sleeves in the same order they came out, then hang them loosely in the roof. Most rods differ slightly in arc or length, and reversing two of them creates impossible wrinkles. With the headliner suspended, center it front to rear and side to side using your chalk marks. Lightly clip the front and rear center points first, then the side centers. This establishes the geometry before final tension. If the kit includes listing wires for side attachments, make sure they are seated evenly and not twisting the seam lines.
Work from the center outward in small increments. Pull enough to remove slack, not enough to distort stitched seams. Steam or gentle heat can relax vinyl, but too much heat shrinks material and telegraphs every mistake. The seams should run straight with equal spacing relative to the roof structure. On cars with separate sail panels, finish the main roof section first, then shape the sail panel area gradually so the transition into quarter trim is smooth. Many installers alternate front, rear, left, and right adjustments to keep tension balanced.
Adhesive and fastening happen in stages. Where the factory used staples into tack strips, staple lightly while confirming symmetry, then return for final securement. Where glue is specified, apply it to the shell and material only within the working zone, allow proper tack time, and press from the center toward edges with a clean upholstery brush. Cut openings for dome lights, visor brackets, and coat hooks only after the material is fully positioned. Make small X-cuts, not large holes. Hardware flanges usually hide the cut if you stay conservative.
Handle board-style and glued headliners without shortcuts
Board-style headliners seem simpler, but they fail when the substrate is ignored. Remove the board carefully because aged fiberboard cracks easily around visor mounts and rear corners. If the board is sound, strip the old foam and adhesive completely using a stiff brush and vacuum. Any decayed foam left behind will create lumps and weak adhesion. If the board is damaged, repair minor cracks from the back with fiberglass mat and resin or flexible panel repair materials, keeping added thickness minimal so trim still fits. Severely warped boards should be replaced.
When bonding new fabric, spray adhesive evenly on both surfaces if the product instructions require it, then lay the material from the center outward. Use your hands first, then a soft brush, to avoid trapping air. Relief cuts around curves must be small and planned; random slashing shows at edges. On formed roof panels with map light pods or sunroof openings, always test-fit the panel in the car before trimming final openings. I have seen excellent bench work ruined because the recovered board shifted slightly during installation and the light opening ended up off-center.
Direct-glue vinyl systems found on some classics and customs demand careful edge management. Because there are no bows to distribute tension, the installer creates shape through staged adhesive work and perimeter stretching. Start at the centerline and establish the most visible plane first. Then wrap edges where trim will cover them, avoiding bulky overlaps at corners. If the original design used separate windlace or pillar pieces, install them in the same sequence the factory intended. This preserves crisp transitions and prevents stacked material from interfering with moldings.
Use the headliner job as the anchor for full interior restoration
The best reason to approach this page as an interior restoration hub is that headliner replacement dictates the order of many surrounding jobs. If the windshield or rear glass must come out, that is the time to replace weatherstrips and inspect pinchwelds. If pillar trim is off, refinish it before final assembly. If sail panels are faded, recover or replace them now so the new roof material does not make old side trim look worse. If the package tray is sun-baked, rebuild it while access is clear through the rear window opening.
Seat upholstery, carpets, and door panels usually come after overhead work. That sequence protects new lower trim from glue overspray, rust dust, and dropped tools. I also recommend evaluating windlace fit before carpet edge binding and sill plates go back on, because compressed old windlace can change door closing feel and trim alignment. On convertibles, the related topic is top pad and well liner service rather than a fixed headliner, but the same restoration logic applies: solve leaks, restore hidden structure, then install finish materials in a disciplined order.
Finally, judge the result by more than wrinkle-free fabric. Check that garnish moldings sit flush, visor mounts are secure, dome lights work, glass seals do not leak, and the cabin looks cohesive from roof to carpet. A properly replaced headliner raises the standard of the entire car. Use it as the starting point for the rest of your interior restoration plan, document every step, and source model-correct parts before disassembly. If you want a classic car interior that feels finished, durable, and true to the era, start overhead and do the system completely.
Frequently Asked Questions
1. What tools and materials do I need to replace a headliner in a classic car?
At a minimum, you will need the correct replacement headliner for your exact year, make, model, and body style, along with any related components such as listing sleeves, windlace, sail panels, tack strips, insulation, and bows if the originals are missing or damaged. Most classic cars from the 1940s through the 1970s used either a bow-style headliner or a board-backed design, and each style requires slightly different supplies. Common tools include hog ring pliers, clips, trim removal tools, screwdrivers, picks, scissors, chalk or masking tape for marking bow locations, a heat gun or steamer for wrinkle control, spray adhesive if your car uses glued sections, contact cement where specified, and a clean workbench for layout. You should also have rust treatment products, sandpaper, degreaser, and primer on hand because once the old headliner comes out, the exposed roof structure often reveals old adhesive, surface rust, failing insulation, or broken retainers that need attention before the new material goes in.
It is also smart to gather more than just the visible trim materials. Many successful installations depend on small items that are easy to overlook, such as binder clips, spring clamps, replacement screws, marker bags for hardware, and reference photos taken during disassembly. If the car has a perforated vinyl headliner, foam-backed fabric, or cloth with stitched seams, the installation method and stretching behavior will be different, so material choice matters. For an accurate, factory-looking result, use a high-quality reproduction kit from a supplier that understands classic interiors rather than trying to adapt a universal liner. The better your preparation and parts quality, the smoother the job will go and the more professional the finished interior will look.
2. How do I remove an old classic car headliner without damaging the interior?
The safest way to remove an old headliner is slowly, methodically, and with careful documentation. Start by disconnecting the battery if you will be working around dome lights or any interior electrical wiring. Remove seats if they restrict access, then take out garnish moldings, visors, rearview mirror, coat hooks, dome lights, shoulder belt anchors if equipped, and any other trim that traps the headliner edges. Label and bag every screw and fastener by location. As you expose the perimeter, take photos of how the material wraps around pinch welds, tack strips, and retainers. On bow-style headliners, the metal bows must go back in the same order and orientation, so mark each one before removal. Many bows are slightly different lengths or have unique bends, and mixing them up is a common cause of poor fit during reinstallation.
As the old material comes down, do not just rip it out. Older vinyl and cloth can be brittle, and sudden force can damage trim, break bow retainers, or tear cardboard sail panels and tack strips that may be difficult to replace. If adhesive is present, soften it with gentle heat and peel the material away gradually. Once the liner is removed, inspect the roof structure thoroughly. This is the ideal time to check for leaks around front and rear glass channels, clean out old nesting material or deteriorated insulation, treat any corrosion, and replace missing anti-rattle pads. A careful removal process not only protects hard-to-find classic car interior parts, but also gives you a clear roadmap for installing the new headliner correctly.
3. What is the correct process for installing a bow-style headliner in a classic car?
Bow-style headliner installation is all about alignment, patience, and even tension. First, compare the new headliner to the old one and verify seam count, sleeve placement, and overall dimensions. Transfer the labeled bows into the correct sleeves in the new headliner, keeping their original order intact. Then install the bows back into the roof supports so the headliner hangs loosely across the cabin. At this stage, the goal is not to stretch everything tight immediately. Instead, center the headliner from side to side and front to back, making sure the stitched seams run straight and parallel with the roof contours. Most restorers begin securing the material at the center points first, typically front and rear, then work outward in small increments toward the corners.
Once the liner is positioned correctly, gradually tension it to remove slack while preserving seam alignment. Use clips to hold the edges as you work before making anything permanent. Pulling too hard in one direction can cause diagonal wrinkles, distorted seams, or a headliner that looks skewed when viewed through the windows. Heat or steam can help the material relax, especially with vinyl, but use it carefully and evenly. As you secure the perimeter to tack strips, retainers, or glued flanges, alternate from side to side to keep tension balanced. The final trimming should not happen until you are fully satisfied with fit and smoothness. Leave enough material for proper retention, then reinstall windlace, garnish moldings, sail panels, and hardware in the reverse order of removal. A correct installation should look smooth, centered, and natural rather than overly stretched.
4. How do I prevent wrinkles, sagging, or fitment problems when replacing a classic car headliner?
Most headliner problems trace back to one of four causes: incorrect part selection, poor preparation, uneven tension, or rushing the job. The first step is ordering a headliner specifically made for your exact vehicle configuration, because body style differences can be subtle but important. Before installation, inspect the bows for bends, compare the new material against the original, and confirm that all retaining points are solid. Replace damaged tack strips and repair loose bow mounts, since no amount of stretching will compensate for weak structure underneath. It also helps to lay the new headliner out in a warm room or in indirect sun before installation so folds from packaging can relax naturally.
During installation, always work from the center outward and from one side to the other in measured, balanced steps. Do not fully lock down one area before the rest of the headliner is aligned. If you see wrinkles, stop and diagnose their direction. Wrinkles running across the car often need front-to-back adjustment, while wrinkles running lengthwise may need side-to-side tension correction. Gentle heat can help vinyl conform, but too much heat can shrink or gloss the surface. Sagging later on is often caused by weak adhesive, dirty bonding surfaces, or insufficient support in board-style systems. In classic cars, temperature swings inside the cabin are severe, so using the correct high-temperature trim adhesive and following cure times matters. The best results come from treating headliner installation as a precision trim job, not simply a fabric-stretching exercise.
5. Should I replace insulation, repair the roof, or handle other restoration work while the headliner is out?
Yes, absolutely. Removing the headliner exposes one of the most valuable hidden work areas in a classic car, and it is the best time to take care of problems that would otherwise remain buried. Once the roof structure is accessible, inspect for rust, pinholes, old collision repairs, water staining, and signs of leaking window seals. If the headliner came out because of sagging, staining, or odor, there is a good chance the real issue started above it. Clean the roof skin thoroughly, remove old adhesive residue, and treat any corrosion properly before covering it back up. If there are loose roof braces or anti-drumming pads, now is the time to fix them. This is also an ideal opportunity to inspect wiring for dome lights, shoulder belt mounts, and rear window defroster components if equipped.
Replacing insulation is often one of the most worthwhile upgrades you can make during a headliner job. Fresh insulation or sound deadening can noticeably improve cabin comfort by reducing heat transfer, road noise, and the hollow drum-like resonance that many older roofs develop over time. It can also improve the way the car smells and feels inside, which is part of why a new headliner is such a transformative restoration step. Just be sure to use materials suited for automotive interiors and avoid anything too thick that interferes with bow spacing, trim fitment, or board installation. In short, if the headliner is already out, think beyond the fabric itself. Addressing rust, sealing leaks, refreshing insulation, and correcting hidden structural or trim issues will protect your work and help the finished interior stay tight, quiet, and attractive for years.




