
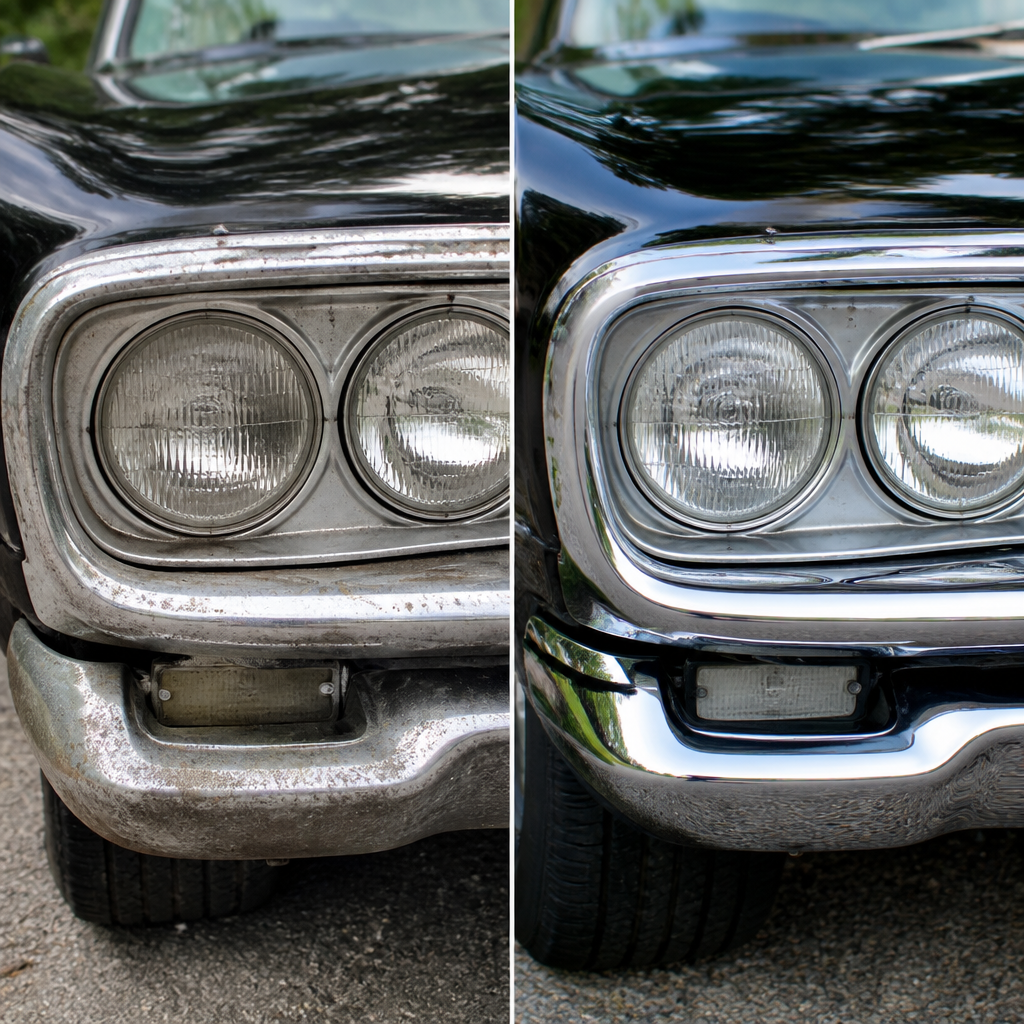
Chrome trim and bumpers define the visual character of a vehicle, but they also reveal age, neglect, and poor storage faster than almost any other exterior component. In restoration work, “chrome” usually refers to a plated finish over steel or pot metal, while polished stainless trim is often grouped into the same conversation because the repair decisions overlap. Bumpers may be thick steel cores with copper, nickel, and chrome plating, or later lightweight assemblies with thinner finishes and hidden brackets. Restoring chrome trim and bumpers means evaluating the base metal, correcting dents and corrosion, deciding between polishing and replating, and reinstalling parts so alignment, finish quality, and long-term protection match the rest of the bodywork and paint. I have worked through enough bumper pulls, trim straightening sessions, and replating estimates to know that the result depends less on the shine you see at the end than on the discipline applied during inspection, labeling, metal correction, and surface preparation at the start.
This subject matters because brightwork sits at the intersection of appearance, cost, and originality. A flawless paint job can still look unfinished next to pitted bumper guards or wavy window moldings. At the same time, chrome restoration can consume a surprising share of a project budget, especially when pot metal parts are rare, mounting studs are broken, or prior repairs left brazing contamination under old plating. Owners also face practical questions: can the part be saved, should it be replaced, is polishing enough, what can be repaired at home, and when is professional plating mandatory? A strong restoration plan answers those questions before money is spent in the wrong place. As a hub topic within bodywork and paint, chrome trim and bumpers connect directly to panel alignment, paint edge treatment, weatherstrip installation, rust prevention, and final detailing. If those systems are handled in isolation, the car may be shiny, but it will not feel properly restored.
Assessing chrome trim and bumper condition before any repair
The first step in restoring chrome trim and bumpers is a structured inspection. Wash every part with wax and grease remover or a mild degreasing soap, then inspect under strong side lighting. What looks like dull chrome may only be oxidation or embedded contamination, while what looks like minor pitting can indicate deep rust under the plating. I separate defects into five categories: surface contamination, finish wear, pitting, deformation, and substrate failure. Surface contamination often responds to clay, chrome polish, or very fine metal finishing compound. Finish wear shows as thinning, yellowing where nickel is exposed, or gray spots where the chrome layer has failed. Pitting usually means moisture reached the base metal through microscopic breaks in the plating. Deformation includes twists, waves, kinks, and parking damage. Substrate failure covers severe rust, perforation, cracked pot metal, stripped studs, and stress fractures near mounting points.
Material identification matters because repair methods differ. A magnet helps separate steel bumpers from aluminum or pot metal components, and stainless trim usually has a softer luster and no flaking plating at cut edges. Steel bumpers can often be straightened, copper built, and replated successfully if the core is not too thin. Pot metal, common on grilles, tail lamp bezels, and ornament bases, is much more difficult because zinc die castings pit internally and distort with heat. Stainless moldings are often the most restorable pieces because they can be filed, sanded, and polished without stripping plating. During teardown, photograph each part on the car, each fastener group, and each shim location. On older vehicles, bumper-to-body spacing and trim alignment rely on factory tolerances that disappeared long ago. If you fail to document the original fit, reassembly becomes guesswork, and even well-restored parts can sit crooked against fresh paint.
Cleaning, polishing, and deciding when chrome can be saved
Not every dull or stained part needs full restoration. In many cases, careful cleaning and polishing recover enough gloss for a driver-quality build and preserve original finishes that still have integrity. Start with the least aggressive method. A pH-balanced wash, microfiber drying, and inspection with a bright LED reveal whether the cloudiness sits on top of the finish or inside it. I use metal polish designed for chrome, soft cotton or microfiber applicators, and patience rather than pressure. Very fine #0000 steel wool lubricated with polish can remove stubborn rust bloom on solid chrome over steel, but it should never be the first choice and should be avoided on delicate trim, anodized aluminum, and uncertain materials. If a haze clears and the reflection sharpens without exposing yellow nickel or copper tones, the part may be suitable for preservation rather than replating.
The key decision is whether the visible damage is cosmetic or structural. Cosmetic issues include water spotting, light oxidation, road film, and shallow scratches that do not break through the plating stack. Structural issues include flaking, pinholes, bubbling, and pitting that catches a fingernail. Once corrosion starts beneath chrome, polishing can improve appearance briefly but cannot stop the failure. This is where owners overspend or underspend. They either polish ruined parts repeatedly and remain disappointed, or they send every piece for expensive replating when some pieces only need stainless correction and machine polishing. Use a standard: if the part will be viewed up close against new paint, imperfections become more obvious, and restoration standards should rise accordingly. For a concours car, a bumper face with peppered pitting is unacceptable. For a survivor truck, preserving original chrome with honest wear may be the right choice. The condition target should match the vehicle’s mission.
Straightening dents, waves, and mounting damage the right way
Straightening chrome trim and bumpers is bodywork in a highly visible, highly unforgiving form. Reflections amplify every low and high spot, so a part that seems straight on the bench can look distorted once installed. Bumpers should be stripped from the vehicle and checked on a flat reference surface, with bracket geometry measured before metal correction begins. Minor steel bumper damage can often be corrected with hydraulic pressure, bumping hammers, dollies, and controlled heat used sparingly on the base metal before replating. Heavy blows directly on plated surfaces usually stretch the metal or fracture the finish in ways that become obvious later. Trim pieces require even more restraint. Stainless moldings can be worked from the back with specialized spoons and soft-faced tools, then draw-filed and sanded to restore crisp lines. Pot metal trim is the least forgiving; aggressive straightening can snap mounting ears or open hidden cracks.
Mounting damage deserves equal attention because fit determines appearance. Bent studs, elongated holes, cracked brackets, and missing spacers cause trim to sit proud of the panel or force bumpers into contact with fresh paint. I always test-fit repaired parts before final finishing because bracket correction after plating risks damaging the restored surface. This is also where bodywork and paint teams must coordinate. Quarter extensions, valances, fender edges, deck lids, and tail panels affect bumper gap consistency. If those panels are not aligned before the bumper is restored, the plater may return a perfect bumper that still looks wrong on the car. The same applies to reveal moldings around glass and body side trim: clip heights, sealer thickness, and replacement weatherstrips can change how moldings seat. Good brightwork restoration is not separate from panel fit; it is the finishing expression of accurate body alignment.
Choosing between DIY refinement, replacement parts, and professional replating
Most restoration projects involve a mix of methods rather than a single solution. Small stainless trim repairs can often be handled in-house with files, abrasives, and polishing wheels. Routine chrome cleaning, light rust removal, and careful preservation are also realistic DIY tasks. Professional replating becomes necessary when steel bumpers are pitted, bent, or peeling; when pot metal parts need copper build and detail repair; or when show-level finish quality is required. Replacement parts enter the conversation when original cores are too far gone or when reproduction bumpers offer acceptable gauge, contour, and plating quality. The problem is that reproduction brightwork varies widely. Some aftermarket bumpers fit reasonably well for driver restorations, while others use thinner steel, softer contours, and plating that fails early at edges and bracket points. Original factory cores often fit better than reproductions even after extensive repair, which is why straight, complete originals remain valuable.
| Option | Best Use | Advantages | Limitations |
|---|---|---|---|
| DIY polishing | Light oxidation, minor staining, survivor vehicles | Low cost, preserves originality, immediate results | Cannot fix pitting, peeling, or deep scratches |
| Stainless restoration | Moldings, reveal trim, rocker trim | Often fully repairable, no replating needed | Labor intensive, requires skill to keep profiles crisp |
| Professional replating | Steel bumpers, pot metal bezels, show builds | Best finish potential, corrects severe defects | High cost, long lead times, quality varies by shop |
| Replacement parts | Missing or unusable cores, budget builds | Fast availability, no core repair needed | Fit and plating quality may be inferior to originals |
When selecting a plating shop, ask specific technical questions. Do they strip chemically or mechanically? How do they handle copper build on pitted steel? Can they repair pot metal and replace studs? What is their process for polishing before nickel and chrome? Reputable shops will discuss triple-plating systems, substrate preparation, masking, and expected lead times in practical terms. They should also be honest about what a damaged part can and cannot become. In my experience, the best shops insist on seeing the actual core before quoting because photographs hide edge thinning, prior solder work, and backside rust. Price alone is a poor guide. A cheap plating job often looks bright at delivery but reveals waves, thin coverage, or rust creep within a few seasons. For restoration-grade work, process discipline matters more than quick turnaround.
How chrome restoration fits into the larger bodywork and paint process
Chrome trim and bumpers should never be treated as the last cosmetic afterthought. Their restoration schedule must be integrated with metal repair, primer surfacing, paint planning, and final assembly. I prefer to evaluate all brightwork before blocking primer because trim holes, clip spacing, and bumper bracket locations influence body corrections. Missing moldings may hide stretched holes, prior welds, or filler shapes that looked acceptable only because trim covered them. During test assembly, install bumpers, end caps, moldings, lamps, and adjacent weatherstrips on the primed shell if possible. This mock-up reveals interference points, inconsistent gaps, and edge conditions before color and clear are at risk. It also prevents the common problem of beautiful paint being chipped during first-fit adjustment of heavy bumpers or stubborn reveal moldings.
Paint edge management is especially important around restored brightwork. Door edge guards, belt moldings, wheel opening trim, windshield reveal moldings, and bumper fillers all create transitions where excessive paint thickness can crack or where insufficient corrosion protection can start rust again. On steel bodies, hidden trim clip areas should be sealed and protected with epoxy primer or appropriate cavity wax after paint cures. On bumper brackets and hardware, use correct coatings and anti-seize where appropriate, but keep products away from visible surfaces and rubber isolators that may react poorly. Final installation should use clean gloves, masked tools, and protective tape on adjacent paint. A fresh chrome bumper can mark paint as easily as paint can scratch chrome. The best restorations feel calm and deliberate at this stage because every clip, gasket, shim, and fastener has already been identified, tested, and staged.
Protecting restored chrome and keeping the finish stable long term
Once chrome trim and bumpers are restored, maintenance determines whether they stay sharp or begin the same decline again. Clean brightwork with mild car shampoo, soft mitts, and separate towels to avoid cross-contaminating polished surfaces with abrasive brake dust or road grit. Dry water spots quickly, especially in hard-water areas, because mineral deposits can etch or dull the finish over time. A quality wax or paint-safe sealant can add short-term protection, though no topical product substitutes for proper plating thickness and corrosion control. For vehicles stored long term, stable humidity matters more than miracle polishes. Condensation trapped in garages attacks bumper backsides, fasteners, and hidden trim channels first, then migrates outward. That is why I inspect the unseen side of every part during maintenance, not just the face.
Seasonal use changes the care plan. Cars driven in coastal environments or on salted roads need frequent rinsing, with attention to seams, brackets, and the backside of bumpers where corrosive residue collects. Show cars that travel in enclosed trailers still face risk from fingerprints, improper straps, and hurried wipe-downs with dirty towels. Use non-ammoniated glass cleaners around chrome-adjacent painted and plated surfaces, and avoid harsh acids or aggressive compounds unless a correction is truly needed. If new rust specks appear, address them early before they become pits. The central lesson of chrome restoration is simple: shine is a surface result of correct decisions underneath. Inspect carefully, repair the substrate properly, integrate brightwork with bodywork and paint, and protect the finish consistently. Do that, and your trim and bumpers will support the whole restoration instead of undermining it. Review your brightwork now, document what can be saved, and build the restoration plan from there.
Frequently Asked Questions
Can chrome trim and bumpers be restored, or do they usually need to be replaced?
In many cases, chrome trim and bumpers can absolutely be restored, but the right path depends on the base material, the extent of damage, and the level of finish you expect when the job is done. Surface haze, light oxidation, minor staining, and fine scratches are often manageable with careful cleaning, decontamination, and polishing. If the part is actually stainless steel trim rather than plated chrome, restoration is often even more feasible because stainless can be straightened, sanded, and polished without relying on a thin decorative plating layer.
When dealing with true chrome-plated parts, the decision gets more technical. Traditional bumpers and trim were commonly built on steel or pot metal and then plated in layers, typically copper, nickel, and chrome. If the chrome is still intact and the metal underneath is sound, a cosmetic improvement may be possible through polishing and rust treatment in surrounding areas. However, once the plating is peeling, deeply pitted, blistered, or flaking, simple polishing will not solve the problem. At that point, proper restoration usually means stripping the old finish, repairing dents and corrosion, rebuilding the surface if needed, and replating.
Replacement is sometimes the better option when a part is heavily rusted through, badly bent, cracked at mounting points, or too distorted to repair economically. Availability matters too. For common vehicles, reproduction bumpers and trim pieces may cost less than high-end restoration. For rare classics, originals are often worth saving because fit, stamping quality, and profile accuracy can be far better than aftermarket replacements. In short, most original chrome components are restorable to some degree, but whether they should be restored comes down to material type, structural condition, authenticity goals, and budget.
What is the difference between restoring chrome-plated parts and polished stainless trim?
This is one of the most important distinctions in exterior restoration because the repair methods are not the same, even though the parts can look similar on the vehicle. Chrome-plated parts have a decorative and protective finish applied over a base metal, often steel or pot metal. That finish is thin and layered, so once it is compromised, you cannot aggressively sand or cut into it without risking complete failure of the surface. If the plating is badly scratched, pitted, or peeling, the proper fix is usually replating rather than heavy polishing.
Polished stainless trim is different because the shine comes from the metal itself, not from a plated coating. That means stainless can often be worked much more directly. Small dents can be gently straightened, scratches can be sanded out in stages, and the surface can be repolished to a mirror-like finish. Because there is no thin chrome layer to preserve, the restorer has more room to correct imperfections. This makes stainless trim very repairable, although it still requires skill to avoid thinning edges, flattening details, or introducing waves into long moldings.
The identification step matters before any tool touches the part. A magnet can help in some cases, but not always conclusively, and visual inspection of the back side is often more informative. Stainless trim may show a consistent silver metal on the reverse, while plated pot metal or steel components usually reveal a different base material beneath the finish. Misidentifying the material is a common mistake. Someone treating chrome like stainless can burn through plating quickly, while someone assuming stainless needs replating may spend money unnecessarily. Knowing what the part is made of determines whether the job is a polish, a metal repair, or a full strip-and-replate process.
How do you know if a bumper or trim piece needs polishing, repair, or full replating?
The best way to evaluate a chrome bumper or trim piece is to inspect it under strong, direct lighting after thoroughly cleaning it. Dirt, wax residue, and oxidation can make a part look worse than it is, but they can also hide serious issues. If the surface has only mild cloudiness, water spotting, or very fine scratches with no lifting or bubbling, polishing may be enough to restore much of the original shine. This is especially true for parts that have been neglected cosmetically but remain structurally solid and fully plated.
If you see dents, creases, curb damage, twisted mounting areas, or deep scratches that interrupt the smooth reflection, the part likely needs physical repair before any finishing work. On stainless trim, that may involve metal straightening, filing, progressive sanding, and machine polishing. On plated bumpers, metal repair usually comes before refinishing and may require stripping the old finish to do the job correctly. Structural integrity matters as much as appearance, especially on bumpers that must mount properly and align cleanly with body lines.
Full replating is generally necessary when there is visible pitting, rust bleeding through the surface, flaking chrome, blisters, peeling edges, or corrosion around seams and mounting points. Pits are especially important because they usually indicate deterioration below the chrome layer, not just on top of it. Polishing cannot remove corrosion that has already eaten into the base metal. Pot metal parts can be even more demanding because they often require copper build-up and careful resurfacing before they can be plated smoothly again. If your goal is show-quality results, even moderate defects that seem acceptable from a few feet away may justify replating. If your goal is a presentable driver, some flaws can be stabilized and improved without going all the way to a full refinish.
What does the chrome restoration process typically involve from start to finish?
A professional chrome restoration usually begins with inspection and disassembly. The restorer evaluates the part’s material, structural condition, previous repairs, rust level, pitting, and any damage around brackets or mounting holes. This early assessment helps determine whether the piece is a good candidate for restoration and what level of work will be required. For bumpers, this stage often includes checking straightness and ensuring the part has not been stretched, folded, or weakened by impact.
After assessment, the old finish is typically stripped so the underlying metal can be repaired correctly. Steel bumpers may need rust removal, dent correction, welding, and smoothing. Pot metal trim can require more delicate reconstruction because it is porous and brittle compared with steel. In higher-end work, the surface is then built back up, often using copper as an intermediate layer that can be polished and refined before the final nickel and chrome are applied. This layering is one reason quality replating can produce such depth and reflectivity compared with quick cosmetic fixes.
Once the metal is properly shaped and prepped, the part moves through plating stages, commonly copper, nickel, and chrome, though exact sequences can vary depending on the material and the shop’s methods. The copper helps level minor imperfections, the nickel provides much of the luster and corrosion resistance, and the chrome delivers the hard, bright outer finish. After plating, the part is inspected for clarity, coverage, and consistency. A good shop will pay attention to edges, recesses, and mounting surfaces, not just the broad visible face.
For stainless trim, the process is different because there may be no plating at all. Restoration usually consists of straightening, removing dents, filing or sanding damage carefully, then polishing through progressively finer abrasives until the surface matches the original finish. Whether you are restoring plated chrome or stainless, the final result depends heavily on preparation. The shine everyone notices at the end is really the product of careful metal correction before the finishing stage ever begins.
Is it better to restore original chrome and bumpers or buy reproduction parts?
That depends on your priorities, but for many restorations, preserving the original parts is the better long-term choice when the components are salvageable. Original trim and bumpers typically fit better, follow the body lines more accurately, and carry details that reproduction parts sometimes miss, such as edge profiles, bracket geometry, contour depth, and metal thickness. This is particularly true on classic cars, where factory components were often heavier and more precisely formed than some aftermarket replacements available today.
Restoring originals is also often the preferred approach when authenticity matters. If the vehicle is rare, historically significant, or being judged at a high level, original pieces that have been properly repaired and refinished usually hold more value than generic replacements. Even on driver-quality projects, original parts may align more cleanly and require less modification during installation. For stainless moldings, original pieces are especially worth saving because the exact shape and finish can be difficult to duplicate with replacements.
That said, reproduction parts can make sense when the originals are missing, rusted through, severely cracked, or so damaged that restoration costs exceed their value. They can also be practical for budget builds where the goal is a neat, presentable appearance rather than factory-level originality. The caution is that not all reproduction chrome is equal. Some aftermarket finishes are thinner, less durable, and more prone to premature rust or peeling, especially in harsh climates or on vehicles stored outdoors. The smartest approach is to compare total cost, expected longevity, fit quality, and your goals for the vehicle. If the original part has solid bones, restoration often delivers the most satisfying result. If the original is beyond saving, a high-quality reproduction may be the best route.




