
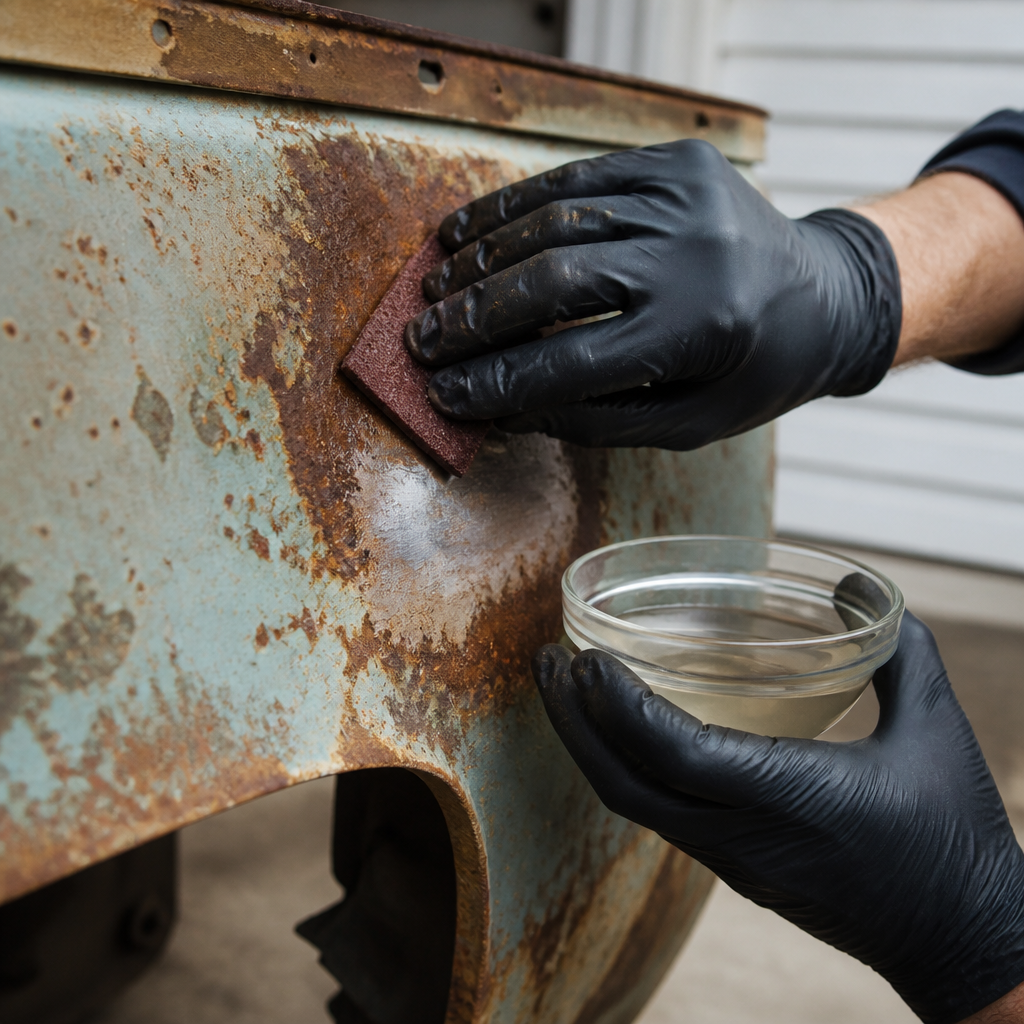
Rust can turn a useful tool, a favorite bike, or a vintage metal sign into something that looks neglected, but effective DIY rust removal techniques can often reverse the damage with simple materials and careful method. In restoration work, rust is the reddish-brown corrosion that forms when iron or steel reacts with oxygen and moisture, creating iron oxides that weaken metal over time. I have used these methods on hand tools, garden furniture, fasteners, cast-iron cookware, and vehicle parts, and the difference between a clean result and a ruined surface usually comes down to matching the technique to the metal, finish, and severity of corrosion. That is why this guide matters within Restoration & Maintenance: it is not just a list of tricks, but a practical hub for DIY restoration guides that helps you diagnose rust, choose the right treatment, protect the underlying material, and prevent the problem from returning. If you want safe, repeatable results, start by understanding that rust removal is really three jobs: removing oxidation, preserving sound metal, and sealing the surface afterward. Every successful restoration balances those three goals.
Before choosing a method, identify the kind of item you are restoring and how deeply the rust has penetrated. Surface rust appears as light orange film or spotting and usually responds well to mild acids, abrasives, or chelating solutions. Scale rust is darker, rougher, and layered; it often needs a combination of chemical soaking and mechanical removal. Structural rust, common on car frames, outdoor railings, or load-bearing hardware, means metal loss has already occurred and cleaning alone will not restore original strength. Also check whether the object has paint, plating, seasoning, chrome, bluing, or a delicate patina that you want to preserve. A wire wheel that works on a shovel can destroy a nickel-plated fixture. Vinegar may clean plain steel effectively but can etch surrounding finishes if left too long. In my shop, the first step is always the same: inspect, photograph, test a small hidden area, and decide whether the goal is functional cleanup, cosmetic restoration, or museum-style preservation. That decision shapes every technique that follows.
How to Assess Rust and Build the Right Removal Plan
The best DIY rust removal techniques begin with assessment, because using the wrong method wastes time and can permanently damage metal. Start by cleaning off dirt, grease, and loose debris with dish soap, warm water, and a nylon brush so you can see the corrosion clearly. Next, determine the base metal. Most household rust problems involve carbon steel or cast iron, but some fixtures have zinc plating, stainless trim, chrome layers, or painted surfaces that need gentler handling. If a magnet sticks strongly, you likely have ferrous metal beneath the finish. Then judge severity. If a Scotch-Brite pad removes discoloration easily, you are dealing with light surface rust. If flakes lift off with a pick and leave pits, the rust is more advanced. Measure risk as well: cookware, cutting tools, and decorative antiques each require different tolerances for abrasion and chemical exposure.
Set up safely before you begin. Wear nitrile gloves for acids and rust converters, eye protection for brushing or grinding, and a respirator if you are creating dust from old coatings. Good ventilation matters, especially when using phosphoric-acid products or aerosol primers afterward. Gather a basic kit: nylon and brass brushes, synthetic abrasive pads, steel wool for appropriate surfaces, wet/dry sandpaper in multiple grits, white vinegar, baking soda, citric acid, rust remover gel, microfiber cloths, plastic tubs, mineral oil, and a protective topcoat suited to the item. For powered work, a drill with a wire cup brush or nonwoven stripping disc saves time on larger pieces, but keep speed controlled. Friction heat can smear metal and damage temper on knives or springs. Good restoration is methodical, not aggressive.
Mechanical Rust Removal for Tools, Hardware, and Heavy Steel
Mechanical removal is often the fastest way to tackle rust on durable items such as wrenches, clamps, hinges, lawn equipment, and steel brackets. The principle is simple: use abrasion to remove iron oxide while stopping before you cut too deeply into sound metal. For light rust, start with a nylon abrasive pad or 0000 steel wool lubricated with light oil. The lubricant lifts residue and reduces scratching. For moderate rust, move to a brass brush, scraper, or 320-grit wet/dry paper. On thicker scale, use a wire wheel in a drill, flap disc on an angle grinder, or needle scaler for very heavy steel. Keep the tool moving, work in shallow passes, and inspect frequently. If the metal starts to shine unevenly with low spots, you are reaching pitted areas and should slow down.
Mechanical methods work well because they are immediate and controllable, but they also have limits. They remove rust and old coatings together, so they are poor choices for plated fixtures, thin sheet metal, or antiques with collector value. I have seen a homeowner erase stamped markings from a vintage hand plane by overusing a grinder; once that detail is gone, it cannot be restored. For hand tools, I usually disassemble first, brush off the heaviest rust, then shift to a chemical soak for joints, threads, and recesses where abrasive tools cannot reach. Follow mechanical cleaning with progressive smoothing if appearance matters: 220 grit, then 400 grit, then metal polish. Wipe all residue away before priming or oiling. Bare steel flash-rusts quickly, especially in humid shops, so protection should begin within minutes, not hours.
Household Acid Methods: Vinegar, Citric Acid, and Baking Soda Neutralization
White vinegar and citric acid remain two of the most reliable low-cost rust removal options for DIY restoration guides because they are easy to source, predictable, and effective on many small to medium steel items. Vinegar contains acetic acid, which slowly dissolves rust; citric acid powder mixed with warm water acts faster and often leaves a cleaner surface. For bolts, pliers, trowels, or old kitchen tools, submerge the metal completely in a plastic container. Typical soak times range from one hour for light rust to overnight for heavier corrosion. Check progress regularly. When rust softens, scrub with a nylon or brass brush under running water. Repeat as needed rather than leaving parts submerged for days, because prolonged acid exposure can darken steel and begin attacking bare metal after the rust is gone.
Neutralization is the step many beginners skip, and it explains why some pieces rust again almost immediately. After removing an item from vinegar or citric acid, rinse thoroughly and then wash in a baking soda and water solution to neutralize residual acidity. Dry completely with towels, compressed air, or gentle heat from a hair dryer. Once dry, apply a protective layer such as paste wax, food-safe oil for cookware, machine oil for tools, or primer for parts that will be painted. These acid methods are excellent for hand tools, fasteners, and hardware, but not ideal for electronics, sealed mechanisms, or items with wood handles that should not be soaked. Disassemble when possible, and mask or isolate nonmetal components. Mild chemistry works best when paired with patience and close inspection, not long unattended soaking.
Commercial Rust Removers, Gels, and Converters
Commercial rust removal products are worth using when you need faster action, better control on vertical surfaces, or less metal loss than strong abrasion can cause. Most fall into three categories: acids, chelating removers, and converters. Acid-based products, often using phosphoric acid, dissolve rust and may leave a phosphate layer that helps primer adhesion. Chelating removers, such as Evapo-Rust, bind specifically to iron oxides and are generally gentler on sound metal, making them popular for precision tools and parts with fine threads. Rust converters do not fully remove corrosion; instead, they chemically transform remaining rust into a more stable black surface that can be painted. Converters are practical for lightly to moderately rusted frames, fences, and hard-to-strip areas where complete removal is unrealistic.
Choose these products based on the object and end use. If you are restoring a machinist vise or plane iron and want clean bare metal, a chelating soak is usually the safest route. If you are preparing a steel gate for repainting, a phosphoric treatment followed by epoxy primer can save substantial labor. If you are stabilizing underside vehicle components, a converter may be the most sensible compromise. Always follow label dwell times and temperature recommendations. Chemistry slows in cold garages, and overapplication can leave residue that interferes with coatings. After treatment, many products still require rinsing, scuffing, or topcoating within a specified window. Read the technical data sheet, not just the front label. In restoration, product category matters more than branding, and correct surface prep determines whether the fix lasts one season or several years.
| Method | Best For | Main Advantage | Main Limitation |
|---|---|---|---|
| Wire brush or sanding | Tools, brackets, heavy steel | Fast and direct | Can scratch or remove detail |
| Vinegar or citric acid soak | Small steel parts, hardware | Low cost and accessible | Needs neutralization and drying |
| Chelating remover | Precision parts, valuable tools | Gentle on sound metal | Higher upfront cost |
| Rust converter | Frames, railings, painted repairs | Stabilizes hard-to-strip rust | Does not restore bare metal |
Special Cases: Cast Iron, Chrome, Painted Surfaces, and Automotive Parts
Some materials need specialized handling because the goal is not merely to remove rust, but to preserve a functional or decorative surface. Cast iron cookware should usually be stripped with vinegar soaks kept brief, electrolysis, or oven-cleaning and reseasoning workflows depending on condition; heavy grinding can flatten the cooking surface and remove historic casting texture. After cleaning, dry thoroughly and rebuild seasoning with thin coats of oil baked at high temperature. Chrome presents a different challenge: the chrome layer may already be compromised, and aggressive abrasion will peel or haze it. In many cases, very fine aluminum foil with water or chrome polish can lift rust staining while being softer than the chrome itself. Painted surfaces require spot treatment. Sanding to feather edges, treating rust beneath blisters, and repainting with compatible primer and topcoat gives better results than attacking the entire panel.
Automotive parts demand the clearest distinction between cosmetic and structural restoration. Surface rust on battery trays, brackets, and suspension components can often be cleaned, treated, and coated successfully at home. Rust on brake lines, frame rails, rocker panels, and mounting points is a safety issue and may require welding or replacement, not DIY cleaning. For car restoration, I routinely combine methods: degreaser first, needle scaler or cup brush for scale, phosphoric prep for remaining oxidation, then epoxy primer and topcoat or cavity wax depending on exposure. This layered approach matters because road salt and moisture exploit any missed area. If a part has flaking lamination or measurable thickness loss, replacement is usually more responsible than restoration. A clean appearance does not equal restored strength, and honest assessment is part of competent maintenance.
Prevention, Finishing, and Building a Complete DIY Restoration Workflow
The most effective rust removal project ends with prevention, because bare metal left unprotected will corrode again quickly. After cleaning, choose a finish based on use environment. Hand tools benefit from light machine oil, paste wax, or products like Boeshield T-9 that leave a protective film without becoming gummy. Outdoor furniture and gates need primer and durable topcoat; an epoxy or zinc-rich primer under exterior enamel provides better long-term resistance than paint alone. Automotive underbody parts often need epoxy primer, chassis paint, and cavity wax in seams. For cast iron cookware, seasoning is the protective system. Moisture control also matters. Store tools in a dry cabinet, use silica gel or vapor corrosion inhibitor paper for enclosed storage, and fix leaks or condensation sources that caused the rust in the first place.
As a hub for DIY restoration guides, this topic connects naturally to related projects: restoring hand tools, refinishing metal patio furniture, cleaning antique hardware, reviving cast iron, and preparing steel parts for paint. The core workflow stays consistent across those jobs. Inspect the object, identify the metal and finish, remove grease, test the least aggressive method first, escalate only as needed, neutralize or rinse chemistry properly, dry completely, and seal the surface immediately. Keep notes on soak times, abrasives, and coatings so successful results can be repeated. Rust removal is not about one miracle product. It is about disciplined process and respect for the material in front of you. Start with a small project this week, apply the right technique, and you will build restoration skills that carry into every maintenance job you tackle.
Frequently Asked Questions
What household items work best for DIY rust removal?
Several common household items can remove light to moderate rust surprisingly well, especially when the corrosion is still mostly on the surface. White vinegar is one of the most reliable options because its mild acidity helps loosen iron oxide without requiring specialized products. It works well for hand tools, bolts, small hardware, and other removable metal pieces that can be soaked. Baking soda is another useful material, particularly when mixed with water into a paste for spot treatment on areas that should not be submerged. Lemon juice and salt can also help break down rust, especially on smaller items or thin surface staining, while a cut potato combined with dish soap or baking soda is a classic trick for lightly rusted blades and garden tools. For tougher buildup, aluminum foil dipped in water or vinegar can be used as a gentle abrasive on chrome or smooth metal surfaces.
The best choice depends on the type of metal, the amount of rust, and whether the item has paint, plating, or delicate finishes you want to preserve. Vinegar is effective but can darken some metals if left too long, so it is important to monitor the soak. Baking soda is gentler and easier to control on exposed areas, making it a good option for cast iron, outdoor furniture, and parts with surrounding materials you do not want to saturate. If the item is heavily corroded, household ingredients may need to be combined with manual scrubbing using steel wool, a nylon brush, fine sandpaper, or a wire brush. In general, household methods are best for manageable rust and routine restoration, while severe structural corrosion may require stronger commercial rust removers or part replacement.
How do I remove rust from tools, hardware, and other small metal items safely?
For small metal items, the safest and most effective process usually starts with dry cleaning and inspection. Brush off loose dirt, grease, and flaking rust first so you can see how serious the corrosion really is. If the item is solid steel or iron with no sensitive handle material, soak it in white vinegar for several hours or overnight, depending on the rust level. Check progress periodically instead of forgetting it in the solution for a full day or longer. Once the rust softens, scrub the surface with a stiff brush, steel wool, or a non-scratch abrasive pad. For threaded parts such as nuts, bolts, and fasteners, a brass brush or old toothbrush can help clean the grooves without being overly aggressive. After scrubbing, rinse thoroughly, dry immediately, and apply a light coat of oil to prevent flash rust from forming on the clean metal.
Safety matters even with simple DIY methods. Wear gloves to protect your skin from grime, sharp edges, and prolonged contact with acidic solutions. Eye protection is a good idea whenever you are brushing or scraping rust, especially on old tools and vehicle parts where brittle particles can break free. Work in a ventilated area, and avoid mixing rust removers with bleach or other cleaners. If the piece has wood handles, painted surfaces, rubber grips, or precision edges, try targeted application rather than full immersion. A baking soda paste or vinegar-soaked cloth can give you more control. Once the rust is removed, finish the job by drying the item completely and adding a protective barrier such as machine oil, paste wax, food-safe oil for certain kitchen tools, or a rust-inhibiting primer if the piece will be painted. That final protection step is what helps keep the rust from quickly returning.
Can DIY rust removal methods damage metal surfaces or finishes?
Yes, they can if the wrong method is used or if a safe method is left in place too long. Rust removal is not just about dissolving corrosion; it also involves protecting the sound metal underneath. Acidic solutions such as vinegar and lemon juice are effective, but overexposure can etch or darken some surfaces. Aggressive abrasives like coarse sandpaper, grinding discs, and stiff wire wheels can remove rust quickly, but they may also scratch the base metal, strip protective coatings, erase markings, or leave visible swirl patterns. This is especially important with chrome, stainless steel, vintage signage, plated hardware, and decorative metalwork where appearance matters as much as function. Cast iron and heavy steel are generally more forgiving, while thin sheet metal or finished surfaces require a lighter touch.
The best way to avoid damage is to match the method to the item and test in a small area first. Use the least aggressive technique that will do the job. Start with soaking, mild abrasives, or paste applications before moving to sanding or power tools. If you are working on a painted bike frame, old garden furniture, or an antique metal sign, isolate the rusted spots instead of treating the entire surface indiscriminately. Keep checking your progress and stop as soon as the rust is gone. Afterward, neutralize any residue if needed, rinse or wipe the surface clean, and dry it thoroughly. If the original finish has been compromised, add protection right away with wax, oil, primer, paint, or a clear sealant. Rust removal is most successful when it restores the item without creating a new problem in the process.
What is the best DIY method for heavily rusted items?
For heavily rusted items, there usually is not a single magic method. The best results come from a step-by-step approach that combines chemical loosening, mechanical removal, and surface protection. Start by evaluating whether the rust is only surface deep or whether it has caused pitting, scaling, thinning, or structural weakness. If the item is still sound, a long soak in white vinegar can help break down thick rust on removable parts like tools, brackets, old fasteners, and machine components. After soaking, scrub with a wire brush, steel wool, or abrasive pad to remove loosened corrosion. If rust remains, repeat the process rather than trying to force everything off in one pass. For broad flat surfaces such as outdoor furniture or metal panels, a baking soda paste followed by hand scrubbing and spot sanding can provide better control.
In more stubborn cases, manual abrasion becomes necessary. A wire brush, drill-mounted wire wheel, sanding sponge, or fine-grit sandpaper can cut through scale that soaking alone will not remove. The key is to remove rust thoroughly without taking away more healthy metal than necessary. Once the visible corrosion is gone, wipe the item clean and inspect for pits or rough areas that may still hold rust residue. If needed, treat those areas again before finishing. For vehicle parts, cast-iron cookware, and restoration projects, the final stages matter just as much as the cleaning itself. Dry the item completely, then seal it appropriately with seasoning oil, protective lubricant, primer, paint, or rust inhibitor depending on the use. If the metal has deep flaking layers, holes, or serious weakness, DIY cleanup may improve appearance but not restore safety. In that case, repair or replacement is the smarter option.
How can I prevent rust from coming back after I remove it?
Rust prevention begins the moment the metal is clean. Bare iron and steel can start oxidizing again very quickly, especially in humid air or if any moisture remains on the surface. After removing rust, dry the item immediately and thoroughly. A clean rag may be enough for simple jobs, but compressed air, a hair dryer, or time in a warm dry area can help drive moisture out of seams, threads, and pits. Once the item is dry, apply the right protective finish for how it will be used. Tools and hardware benefit from a light coat of machine oil, silicone spray, or paste wax. Cast-iron cookware should be dried completely and re-seasoned with a thin layer of oil. Outdoor furniture, bike parts, and automotive components often need primer and paint or a dedicated rust-inhibiting coating to stand up to weather.
Long-term prevention also depends on storage and maintenance habits. Keep metal items in a dry environment whenever possible, and avoid leaving tools, fasteners, or equipment on concrete floors, in damp sheds, or exposed to rain. Use desiccant packs, dehumidifiers, or sealed bins for valuable hand tools and vintage items. Wipe down garden tools after use, especially if they have been in wet soil. Clean road salt off bike frames and vehicle parts before it can accelerate corrosion. Reapply protective oils or waxes periodically, because they wear away over time. For painted surfaces, inspect chips and scratches early and touch them up before rust gets a foothold again. The most effective DIY rust removal technique is not just removing corrosion once, but creating a routine that keeps moisture, oxygen, and neglected surfaces from starting the cycle all over again.




