
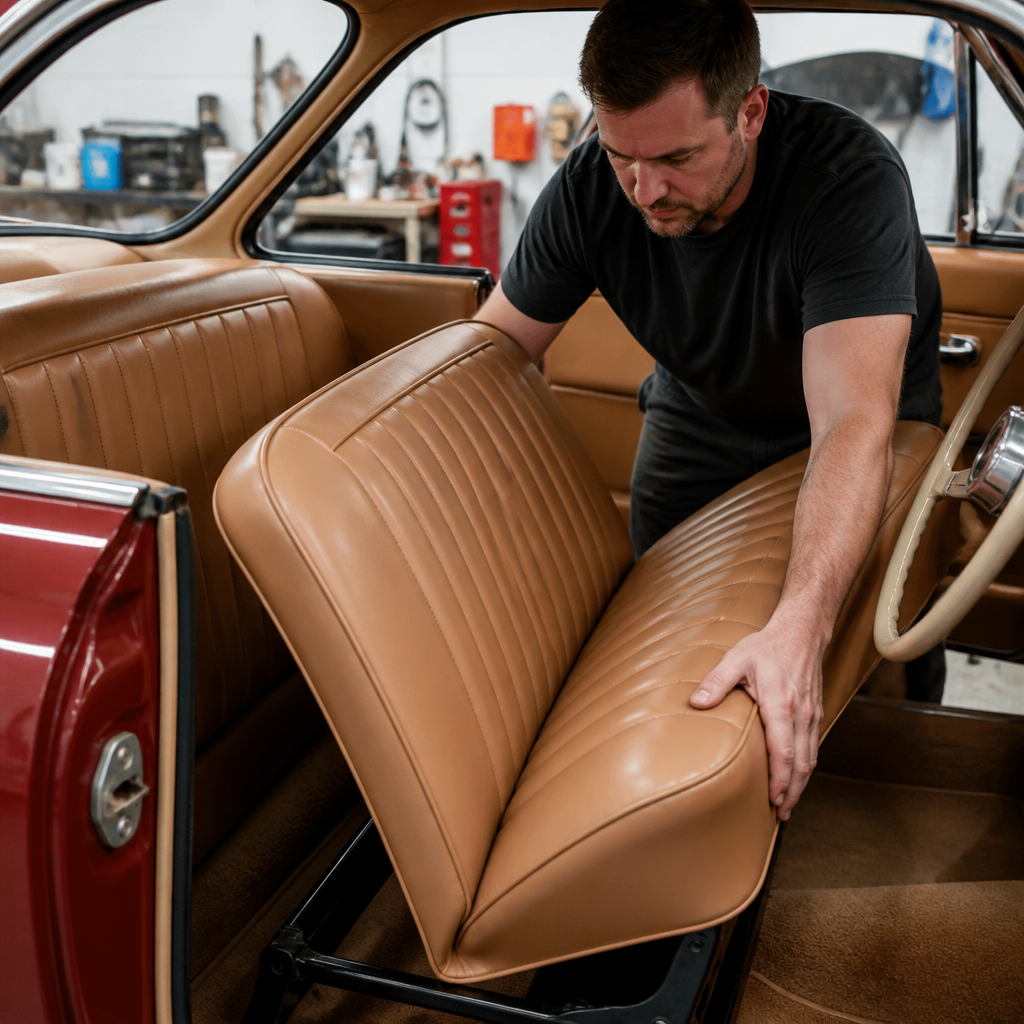
Installing new upholstery in a classic car is one of the most visible upgrades in any restoration, and it changes more than appearance. Fresh seat covers, door panels, padding, carpet, and headliner improve comfort, reduce noise, protect restored metalwork, and bring the cabin back to the period-correct character that defines a successful build. In classic car restoration, upholstery means every soft interior surface, from burlap and foam under the seat skins to windlace around the doors. A DIY restoration guide for upholstery must therefore cover planning, materials, tools, sequencing, and quality standards, not just how to stretch fabric over a seat frame.
This topic matters because interior work sits at the intersection of craftsmanship and preservation. I have seen beautifully painted classics lose value because the upholstery looked generic, wrinkled, or incorrectly fitted. I have also seen modest driver-quality cars gain major appeal after careful interior restoration using accurate grain vinyl, correct pleat spacing, and properly molded carpet. Buyers notice fit, symmetry, stitching, and hardware placement immediately. More important, owners feel the difference every time they drive. Good upholstery supports posture, prevents squeaks, and keeps heat and moisture from damaging the floor, seat springs, and trim boards underneath.
As a hub within Restoration & Maintenance, this guide connects the full DIY restoration workflow. Installing upholstery is rarely a standalone task. It depends on rust repair, floor pan sealing, sound deadening, seat frame refurbishment, trim hardware cleaning, weatherstrip replacement, and often electrical work under the dash or seats. The smartest approach is to understand the whole sequence before ordering parts or removing the first hog ring. That is why this article covers the complete process, explains where a home restorer can confidently work, and identifies where specialist help may save time, money, and irreplaceable original components.
Plan the restoration before you remove a single panel
The best upholstery installation starts with documentation. Before disassembly, photograph every seat face, seam, listing wire location, attachment point, and trim screw. Take wide shots of the cabin and close-ups of details such as seat-back release bezels, armrest bases, windlace ends, and package tray edges. Bag and label hardware by location. Measure pleat count, stitch spacing, and panel orientation. Factory assembly manuals, Fisher Body manuals, and marque-specific club resources are especially valuable for American and European classics because they show original attachment methods and trim patterns. If your goal is authenticity, compare your car against trim tag data and reputable reproduction catalogs before ordering anything.
Scope matters. A full interior kit may include seat upholstery, molded carpet, door panels, headliner, sail panels, kick panels, trunk mat, insulation, and sun visors. However, installing everything at once can create access conflicts. In most builds, I finish hidden work first: floor repairs, seam sealer, primer, paint, wiring, HVAC service, and window regulator lubrication. Then I dry-fit insulation and carpet, rebuild seats on the bench, install the headliner before fixed glass if applicable, fit side panels, and leave final carpet trimming and sill plates until late in the process. Working in the right order prevents damage and keeps expensive new materials off dirty floors.
Budgeting should include more than the upholstery kit itself. Expect to replace seat buns, burlap, listing wires, hog rings, jute or modern insulation, panel clips, vapor barriers, contact adhesive, scrim foam, and often broken seat springs. Tools matter too: hog ring pliers, steam source, heat gun, upholstery spreaders, trim tools, pneumatic stapler where appropriate, and a quality spray adhesive rated for automotive heat. Cheap glue is a false economy. Cabins regularly exceed 140 degrees Fahrenheit in summer sun, and weak adhesive lets carpet, foam, or vinyl delaminate. Buy materials designed for automotive interiors, not household substitutes.
Choose the right materials for originality, durability, and fit
Classic car upholstery materials fall into several categories: vinyl, cloth, leather, carpet, foam, padding, board stock, and insulation. The correct choice depends on the car’s era, trim level, intended use, and restoration standard. Many 1950s through 1970s American cars used expanded grain vinyl on seats and door panels, sometimes paired with cloth inserts. British roadsters often used leather-faced seat covers and hardura-style boot materials. German cars may require square-weave carpet for an authentic result. Reproduction suppliers such as Legendary Auto Interiors, PUI Interiors, TMI, Distinctive Industries, and SMS Auto Fabrics serve different marques and quality levels, so compare sample swatches before committing.
Foam and support layers determine whether seats feel correct. Original seats often relied on coil springs, burlap, cotton batting, and molded foam working together. If you install new covers over collapsed foundations, wrinkles and poor shaping are inevitable. Replace broken zig-zag springs, repair spring ties, and use the proper density foam. High-density polyurethane foam works well for support, while softer foam helps top-surface contouring. Scrim-backed sew foam is useful behind pleated sections because it supports stitching definition. On many bench and bucket seats, listing wires pull seams into the foam and frame. Reusing rusty, bent listing wires almost always produces crooked pleats.
Use this quick comparison when selecting common upholstery materials for a DIY classic car interior:
| Material | Best Use | Advantages | Limitations |
|---|---|---|---|
| Automotive vinyl | Seats, door panels | Period-correct, durable, easy to clean | Can shrink or stiffen if low quality |
| Leather | Premium seat surfaces | Rich appearance, breathable, repairable | Higher cost, requires conditioning |
| Molded carpet | Floor coverage | Fast installation, shaped to floor pan | Often needs trimming and heat fitting |
| Mass-backed carpet | Noise reduction | Better sound control, fuller feel | Thicker around pedals and trim edges |
| Jute padding | Under carpet | Traditional look, inexpensive | Absorbs moisture if leaks persist |
| Closed-cell insulation | Heat and sound barrier | Moisture resistant, modern performance | Less original for judged restorations |
Originality and drivability can coexist, but you need to decide where compromise is acceptable. For concours work, factory grain, stitch count, heat-seam pattern, and carpet binding matter. For a touring car, I often choose hidden modern upgrades such as butyl sound deadener topped with closed-cell foam under stock-style carpet. The cabin becomes quieter and cooler without changing visible surfaces. Be careful with universal kits advertised as fitting many models. Classic interiors vary widely around seat hinge escutcheons, package trays, transmission tunnels, and rear armrests. Model-specific kits usually save hours of trimming and produce more accurate contours.
Rebuild the structure under the upholstery
Professional-looking upholstery is built on repaired structure. Start with seat frames. Strip old covers carefully because they reveal how the factory tensioned the material. Remove hog rings, then inspect for cracked frame welds, broken recliner mechanisms, twisted tracks, missing anti-rattle bushings, and fatigued springs. Media blast or wire-brush the metal, treat rust, and repaint with a durable chassis or epoxy coating. Lubricate tracks lightly and verify that release mechanisms work before the new covers go on. If a seat frame rocks or binds after installation, fixing it later means undoing finished upholstery.
Next, restore the cabin shell. Floors should be solid, sealed, and fully dry. Use epoxy primer on bare metal repairs, seam sealer along joints, and topcoat where required. Add drain plug grommets and verify cowl, windshield, rear glass, and door seals before laying insulation. Water leaks destroy new carpet and door panels faster than almost any other issue. Door panels also depend on healthy inner doors. Replace window channel felt, moisture barriers, and rusty panel clips. A simple plastic vapor barrier sealed with butyl tape helps protect door cards from condensation and rain intrusion past the outer sweep.
Trim boards and panel backers deserve equal attention. Many originals were made from pressed fiberboard that warps after decades of moisture. Reproduction boards are available for some cars, but you can also trace and cut new backers from automotive door panel board. Transfer clip holes precisely. Too loose and panels rattle; too tight and the board tears during installation. Windlace, package tray supports, and sail panels should be test-fitted before upholstery adhesive is applied. Classic interiors are assemblies of interacting layers. If one substrate sits proud by a quarter inch, every adjacent trim piece fights for the same space.
Install seat upholstery with tension, heat, and symmetry
Seat upholstery is where most restorers either gain confidence or get overwhelmed. The essential principle is controlled tension. New vinyl and leather covers are intentionally tight, because loose material wrinkles quickly in use. Warm the covers before installation using sunlight, a steamer, or gentle heat gun technique. Do not scorch the material. Fit the cover over the seat in stages, beginning with central listings and anchor points before the outer perimeter. Use new hog rings and quality pliers. Symmetry matters: count attachment positions from the centerline so pleats remain straight and bolsters match side to side.
For foam seats, add a thin plastic slip sheet over the bun to help the cover slide into position; remove or tear it away where needed once the cover is seated. Steam is especially effective on wrinkles because it relaxes vinyl and helps fabric conform to contours. On seats with separate seatback and base sections, finish one fully before repeating the exact sequence on the other side. Compare both seats under the same lighting. Minor twists become obvious once they are inside the car. If a seam drifts off-center, stop and correct it early. Pulling harder rarely fixes a misaligned listing.
Rear seats usually seem easier, but package tray angles, armrest transitions, and fold-down features can complicate fitment. Bench backs often use long listing wires hidden deep in the cover, so verify engagement before closing the perimeter. Replace crumbly cotton padding and damaged cardboard tack strips. If your car uses metal seatback tabs, bend them carefully with trim tools and protect the new material from sharp edges. After assembly, let the seats rest in a warm room before final evaluation. Freshly installed covers often settle slightly, and light steaming can refine the finish without overstretching seams or weakening stitch lines.
Fit the headliner, carpet, and panels in the right sequence
Headliner installation is one of the most technical parts of a classic car interior restoration. On cars with bow-style headliners, each sleeve and bow position must match the original order to maintain seam spacing and roof contour. Mark every bow during removal. Install the headliner from the center outward, tensioning front to rear and side to side gradually. Binder clips are useful for trial positioning before glue or final retainers. Heat helps remove minor waves, but over-tension can tear seams or distort the listing pockets. If fixed front or rear glass is out, headliner work becomes much easier and cleaner.
Carpet comes next in most projects. Start by dry-fitting the molded sections and locating seat mounts, shifter openings, pedals, and sill edges. Never cut holes at full size initially. Make small X-cuts, test fit, and enlarge only as needed. A steamer or heat gun helps molded carpet relax around transmission tunnels and toe boards. Use spray adhesive selectively; many carpets are held by trim plates, seats, console, and sill moldings, and too much glue makes future service difficult. Underlayment should lie flat, especially around pedal travel and seat track movement, where bunching becomes both a fit issue and a safety concern.
Door panels, quarter panels, kick panels, and package trays finish the cabin. Install fresh moisture barriers first. Align clips with holes, strike panels with the heel of your hand near each clip, and avoid pressing on unsupported decorative areas. Refit handles and escutcheons with the correct gaskets to prevent scuffing. On cars with rear side panels or sail panels overlapping the headliner edge, work in the exact factory sequence. Then install windlace, scuff plates, seat belts, and seats last. This order protects the new materials and makes alignment easier. A clean, staged installation always looks more factory-correct than a rushed one.
Avoid common mistakes and know when to call a specialist
The most common upholstery failures in classic cars are predictable: installing over bad foundations, trimming carpet too aggressively, skipping leak repairs, using low-temperature adhesive, and forcing reproduction parts that need modification. Another frequent mistake is judging fit while the material is cold. Vinyl shrinks in a cool garage and relaxes when warm, so tension should be evaluated at realistic cabin temperatures. I also see restorers discard original parts too early. Even torn covers and warped panels provide templates, hardware references, and evidence of factory construction methods that many reproduction instructions omit.
Some jobs justify professional help. Complex French seams, leather panel remakes, convertible top pads, rare fabric pattern matching, and custom foam sculpting require industrial sewing machines and deep trim experience. The same is true for high-value cars where incorrect stitching can materially affect value. A sensible hybrid approach is to rebuild seat frames, floors, and insulation yourself, then outsource sewing or headliner installation while handling final assembly. That still reduces cost and keeps you close to the project. If you do hire a trim shop, provide photos, trim codes, and a clear goal: concours correctness, stock appearance, or tasteful restomod durability.
New upholstery transforms a classic car when the work is planned, sequential, and precise. Start with research, document everything, and build on solid metal, repaired seat frames, and dry floors. Choose materials that match your restoration standard, install seat covers with controlled heat and even tension, and fit the headliner, carpet, and panels in the correct order. The reward is a cabin that looks right, feels comfortable, and supports the car’s long-term value. If you are building out your DIY Restoration Guides library, use this hub as the starting point, then move next to floor repair, weatherstripping, seat frame restoration, and sound deadening.
Frequently Asked Questions
What should I replace when installing new upholstery in a classic car?
In most classic car interiors, upholstery is much more than just seat covers. A proper installation usually includes seat skins, seat foam, burlap, listing wires, hog rings, jute padding, carpet, sound deadener, underlayment, door panels, armrests, package tray material, kick panels, windlace, sail panels, and often the headliner. If you are restoring the car to a high standard, it is also wise to inspect and replace hidden support materials such as seat springs, seat diaphragms, tack strips, panel clips, and moisture barriers behind door panels.
The best approach is to treat the interior as a complete system rather than a set of isolated parts. For example, installing beautiful new seat covers over collapsed foam or broken springs will still leave the seats looking uneven and feeling uncomfortable. In the same way, fresh carpet laid over rusty floors, missing insulation, or old adhesive will not last and may trap moisture. Replacing the soft interior surfaces is also a good opportunity to protect restored metalwork, improve cabin quietness, and correct small fit issues around trim and weatherstripping.
If originality matters, compare your car’s existing materials and patterns with factory references or a reputable upholstery kit supplier. Many classic cars used very specific grain patterns, pleat spacing, stitching styles, and color combinations. Even details like windlace profile, carpet edge binding, and seat button placement can affect whether the cabin feels truly period-correct. A thoughtful replacement plan saves time, reduces rework, and helps the finished interior look cohesive rather than pieced together.
Can I install classic car upholstery myself, or should I hire a professional?
A skilled DIYer can absolutely install upholstery in a classic car, especially when working with a high-quality pre-sewn interior kit. Seat covers, carpet sets, door panels, and insulation are all within reach for someone who is patient, organized, and comfortable following a step-by-step process. However, success depends less on raw mechanical ability and more on attention to detail. Upholstery work rewards careful measuring, trial fitting, even tension, clean adhesive application, and the willingness to remove and redo pieces until they sit correctly.
The most manageable DIY approach is to break the job into sections. Seats are often a good starting point because they can be worked on outside the car and allow you to learn how foam, hog rings, listing wires, and cover tension all interact. Carpet is another common DIY task, though it requires careful trimming around seat mounts, console openings, pedals, and sill plates. Headliners are usually the most challenging part because they demand precise stretching and alignment over large, visible surfaces, and one mistake can create wrinkles that are hard to remove.
Hiring a professional may be the better choice if the car has rare trim, custom interiors, heavily damaged seat frames, or if originality is critical for show judging. A professional upholstery shop is also better equipped to rebuild spring units, fabricate missing panels, and shape foam for a factory-correct profile. In many restorations, owners choose a hybrid route: they install sound deadener, insulation, and carpet themselves, then have a trimmer handle the seats and headliner. That can control cost while still protecting the quality of the most difficult visible work.
What tools and materials are needed to install new upholstery properly?
The exact tool list depends on the car and how complete the restoration is, but a solid upholstery setup usually includes hog ring pliers, hog rings, side cutters, a trim removal tool set, screwdrivers, socket sets, spray adhesive, scissors, chalk or masking tape for marking, utility knives with fresh blades, a heat gun or steamer for relaxing vinyl, and pliers for working listing rods and clips. You may also need a staple gun for some panels, contact cement for localized repairs, rust treatment products, and seam sealer if floor or interior metal repairs are involved before installation.
Materials are just as important as tools. New upholstery should not go over compromised foundation layers. That means replacing worn burlap, flattened foam, broken cotton batting, deteriorated jute, damaged moisture barriers, and cracked tack strips where applicable. For the floor, many restorers install sound deadening mats first, then a heat and noise insulation layer, followed by carpet padding or jute and finally the carpet itself. In the doors and quarter sections, vapor barriers are critical because they help prevent moisture from reaching your new panels and soft trim.
Organization also makes a big difference. Bag and label every screw, clip, retainer, and trim piece as you disassemble the interior. Take photos from multiple angles before removing anything, especially around seat tracks, armrests, garnish moldings, and headliner bows. Classic cars often have small year-to-year differences, and those reference images can be invaluable during reassembly. Having the right supplies ready before you begin keeps the installation cleaner, faster, and much less frustrating.
How do I make sure the new upholstery fits correctly and looks factory-quality?
Factory-quality results come from preparation, patience, and sequence. Before any new upholstery goes in, the interior structure needs to be solid, clean, and properly aligned. Seat frames should be repaired and painted, springs secured, floor pans rust-free, and all mounting points confirmed. Test-fit hard components such as seats, tracks, console, sill plates, and panels before final upholstery installation. If a bracket is bent or a mounting hole is misaligned, it is much easier to correct that issue before fresh material is in place.
When installing seat covers, the goal is even tension, centered seams, and a natural contour that matches the original seat shape. Most vinyl and some leather respond well to warmth, so allowing the material to sit in the sun or gently heating it can help it stretch into place without forcing it. Work slowly from the center outward, attaching listings and hog rings in stages while checking symmetry constantly. If one side is pulled tighter than the other, the pleats and seams can drift, making the seat look twisted even if the cover itself is technically installed.
For carpet and panels, dry-fit everything before trimming. Many molded carpet sets are intentionally oversized, which is helpful, but only if you trim gradually. Cut small amounts at a time around shifters, pedals, seat brackets, and wheel housings. Door panels should sit flat without bowing, and clips should engage cleanly without forcing the board. On headliners, centerline alignment and gradual tensioning are critical to avoiding wrinkles. Throughout the job, compare both sides of the car frequently. Consistency is one of the biggest visual clues that separates a clean restoration from an average one.
What are the most common mistakes to avoid when replacing upholstery in a classic car?
One of the biggest mistakes is installing new upholstery over worn-out or damaged underlying materials. Fresh covers cannot hide broken seat springs, sagging diaphragms, rotten burlap, or lumpy foam for long. Another common problem is rushing disassembly and failing to document how parts came apart. Losing seat side trim hardware, mixing up headliner bows, or forgetting the order of spacers and brackets can create major delays later. Good upholstery work begins before the first new piece is installed.
Another frequent mistake is trimming too aggressively. Carpet, insulation, moisture barriers, and even some seat materials should be cut conservatively because you can always remove more later, but you cannot add material back once it is gone. The same principle applies to adhesive. Too much glue can bleed through material, create uneven surfaces, or make future adjustments difficult. Too little can lead to lifting corners and loose edges. Use the correct product for the material and apply it in controlled, even passes according to the manufacturer’s instructions.
Finally, many restorers underestimate the value of sequencing and environmental conditions. Upholstery installation should happen after messy fabrication, welding, and painting work is complete, and ideally in a clean, dry space. Vinyl and adhesives react differently in cold temperatures, and moisture trapped under carpet or behind panels can undermine the entire job. Taking time to prep surfaces, protect metal from corrosion, confirm fit before final fastening, and install each component in the right order will dramatically improve both the appearance and durability of the finished classic car interior.




