
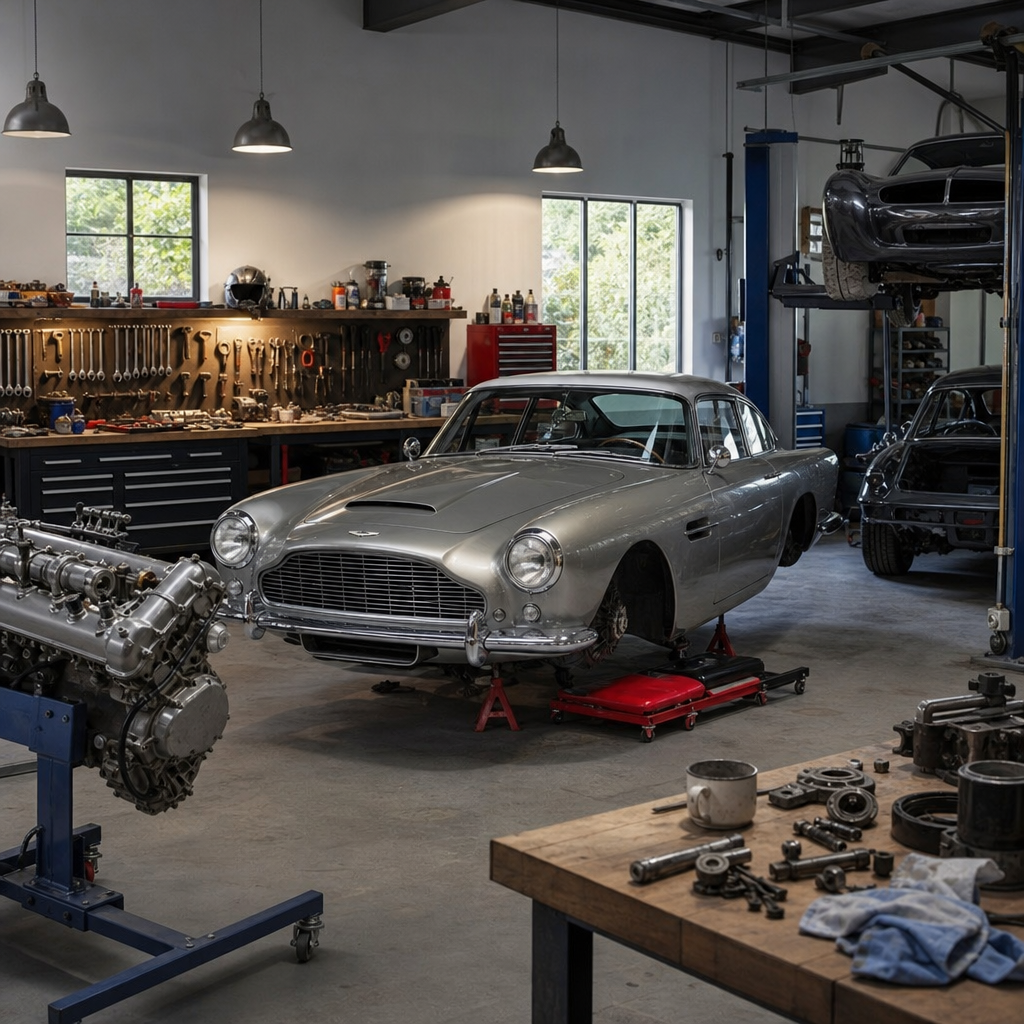
Building the ultimate restoration workshop for your classic car starts with understanding that a productive shop is not defined by expensive gadgets alone, but by layout, safety, power, lighting, storage, and the right tools for repeatable, high-quality work. In the context of classic car restoration, a workshop is the physical system that supports inspection, disassembly, fabrication, repair, refinishing, reassembly, and long-term maintenance. Tools and equipment include everything from hand wrenches and torque tools to welders, compressors, parts washers, lifts, lighting, ventilation, and digital documentation gear. When I have helped set up restoration spaces, the biggest difference between frustrating projects and smooth ones was never brand prestige; it was whether the workshop matched the jobs being performed. A cramped garage with excellent lighting, organized storage, and safe electrical service routinely outperforms a larger space filled with poorly chosen equipment. That matters because classic cars demand patience, precision, and protection of often irreplaceable components. A workshop built for restoration reduces damaged parts, wasted hours, and avoidable safety risks while making every repair more accurate.
Classic car projects are also different from ordinary maintenance. Restoring a 1967 Mustang, a W113 Mercedes-Benz, or an air-cooled Porsche involves seized fasteners, obsolete hardware, delicate trim, corrosion repair, paint preparation, and exact reassembly standards. You may need to strip undercoating, measure crankshaft journals, shrink-stretch patch panels, or rebuild drum brakes using service manual tolerances rather than guesswork. That variety is why this tools and equipment hub matters within restoration and maintenance. It should guide decisions about what to buy first, what can wait, what should be outsourced, and how to create a workshop that grows with your skills. The ultimate restoration workshop is not necessarily the largest or most expensive one. It is the shop where every square foot has a purpose, every tool has a home, and every task can be completed safely, efficiently, and to a standard you would trust on your own finished car.
Plan the workshop around workflow, not wish lists
The smartest way to build a restoration workshop is to map the sequence of work before buying equipment. Every project moves through intake, cleaning, inspection, teardown, labeling, repair, mock-up, final assembly, and testing. If your space forces you to move engines across the paint-prep area or stack chrome trim beside a welding bench, mistakes become inevitable. Start by dividing the shop into zones: dirty work, clean assembly, fabrication, finishing, storage, and reference. Dirty work includes degreasing, grinding, rust removal, and underbody scraping. Clean assembly is where engines, carburetors, electrical components, and interior trim are handled. Fabrication houses vises, drill presses, welders, and sheet metal tools. Finishing needs excellent light, dust control, and separation from sparks. Reference space includes a bench for manuals, laptop access, labeling supplies, and photo documentation.
A one-car garage can still support this workflow if zones are flexible. I have seen outstanding restorations completed in 24-by-24-foot garages using rolling benches, wall-mounted cabinets, and mobile welding carts. The key is preserving access around the car. Aim for at least three feet on each side, with wider clearance near the front for engine removal. Keep the clean bench away from grinding dust. Store removed parts in labeled bins by system: suspension, interior, fuel, fasteners, glass, and trim. If possible, dedicate shelving to the specific vehicle so parts from multiple projects never mix. Workflow planning also informs future internal equipment purchases. If bodywork is central to your projects, prioritize metal shaping and air tools earlier. If your focus is drivability restoration, put more budget into measuring tools, diagnostic gear, and an engine stand before buying specialty fabrication machines.
Build the foundation: flooring, lighting, power, and ventilation
Before buying specialty tools, build infrastructure that improves every job. Flooring should be level, sealed, and easy to clean. Epoxy or polyaspartic coatings make fastener retrieval easier and resist oil, brake fluid, and solvents better than bare concrete, although hot-tire pickup and prep quality vary by product. If coating is not possible, at least repair cracks and use anti-fatigue mats at benches. Lighting is one of the highest-return upgrades in any restoration workshop. For general work, bright LED fixtures in the 4000K to 5000K range reveal paint defects, leaks, and hardware markings without the yellow cast common in old shop lighting. Supplement overhead fixtures with magnetic task lights, underhood LEDs, and high-CRI inspection lamps for color-sensitive work.
Electrical service must match your equipment list. Many home shops operate comfortably on 100 to 200 amp service, but welders, larger compressors, heaters, and lifts may require dedicated circuits or 240-volt outlets. Install more receptacles than you think you need, positioned above bench height and near garage doors, compressor locations, and charging stations. Good cable management matters as much as outlet count; extension cords across the floor are trip hazards and can damage paint or trim during movement around the car. Ventilation is equally critical. Grinding dust, paint vapors, welding fumes, and solvent fumes do not belong in enclosed air. At minimum, use cross-ventilation with intake and exhaust fans, plus local extraction near welding and chemical cleaning stations. If you spray coatings at home, verify local regulations and use proper filtration and respiratory protection. Comfort systems are not luxuries either. Stable temperature and humidity reduce rust on bare metal, improve paint and adhesive performance, and make long restoration sessions sustainable.
Choose core hand tools, lifting gear, and measuring equipment first
The foundation of a restoration workshop is a complete, durable set of hand tools and support equipment. Buy these before chasing specialized machines because they affect every phase of the job. A serious classic car setup needs combination wrenches in SAE and metric sizes, six-point sockets in shallow and deep profiles, 1/4-inch, 3/8-inch, and 1/2-inch drive ratchets, breaker bars, torque wrenches, screwdrivers that fit old fastener standards correctly, dead-blow hammers, pry bars, punches, picks, snap-ring pliers, trim tools, and line wrenches for brake and fuel fittings. For older British and European cars, include Whitworth or other uncommon sizing where required. Cheap fasteners are replaceable; original hardware often is not, so tool fit matters.
Lifting gear deserves the same attention. A high-quality floor jack with enough reach for low-slung cars, four to six heavy-duty jack stands, wheel dollies, an engine hoist, and an engine stand are essential. If ceiling height allows, a two-post lift transforms underbody access, brake line work, exhaust fitting, and suspension rebuilding. In lower garages, a mid-rise scissor lift still offers huge gains over floor work. Measurement tools separate guesswork from craftsmanship. You need at least calipers, micrometers, a dial indicator with magnetic base, feeler gauges, straightedges, thread pitch gauges, a compression tester, a leak-down tester, and a multimeter. A borescope is increasingly useful for inspecting cavities, cylinders, and inaccessible rust areas. Workshop manuals provide tolerance data, but tools provide the truth. In classic restoration, accurate measurement prevents expensive mistakes such as over-torqued main caps, warped brake drums, incorrect pinion preload, or uneven panel gaps.
Add fabrication, air, and diagnostic equipment based on project type
Once the core setup is complete, add equipment according to the kind of restoration work you actually perform. For metal repair, a 180- to 210-amp MIG welder with gas shielding is the practical baseline for patch panels, brackets, and floor sections. TIG welding offers cleaner control for thinner material, stainless, and aluminum, but it has a steeper learning curve and higher time cost. A plasma cutter can save hours on rusty shells, though many restorers still rely on cutoff wheels and air saws for tighter control around irreplaceable structure. Air supply is another major decision. Compressors should be sized by continuous demand, not brochure peak numbers. For intermittent use with impact tools and blow guns, a 60-gallon unit may suffice. For sanding, die grinding, or paint work, prioritize delivered CFM at operating pressure, moisture separation, and quality plumbing. Hard lines with drip legs and a desiccant dryer outperform dragging hoses directly from a tank full of warm, wet air.
Diagnostic tools matter even on carbureted classics. A digital multimeter, battery maintainer, timing light, dwell meter for point ignitions, vacuum gauge, fuel pressure gauge, test light, and OBD tool for later classics should all be considered. I also recommend a label printer, digital camera, and parts-cleaning setup because documentation is diagnostic insurance during long projects. The right next purchase depends on your restoration profile.
| Workshop focus | Best early equipment upgrades | Why they matter |
|---|---|---|
| Body and rust repair | MIG welder, shrinker stretcher, angle grinder set, welding table | Supports patch panel fabrication, bracket repair, and repeatable panel fit |
| Engine and driveline rebuilding | Engine stand, parts washer, micrometers, ring compressor, torque angle gauge | Improves measurement accuracy, cleanliness, and assembly consistency |
| Electrical restoration | Multimeter, terminal crimp system, heat gun, wiring bench, power probe | Reduces misdiagnosis and produces durable, factory-style harness repairs |
| Paint and surface prep | Compressor upgrade, moisture control, long-board sanders, bright inspection lights | Prevents contamination and reveals surface defects before topcoat |
| General maintenance and drivability | Lift, brake bleeder, vacuum gauges, cooling system pressure tester | Makes recurring service faster and improves fault isolation |
Organize storage, parts handling, and documentation like a professional shop
Classic car restoration is won or lost in organization. Every fastener, clip, shim, bracket, and trim screw needs a retrieval system. I prefer clear stackable bins, resealable bags, and acid-free tags, all linked to photo documentation. During teardown, photograph each assembly before removal, after partial disassembly, and once individual components are separated. Label bags with subsystem, orientation, quantity, and whether hardware is reusable, plated, or replacement-only. Shelving should be heavy-duty and deep enough for subassemblies such as steering boxes, heater units, and bumpers, but not so deep that parts disappear behind one another. Use padded racks for glass and trim, and keep interior materials away from welding dust, UV exposure, and moisture.
Workbench design also matters. A restoration bench should be sturdy enough for pressing bushings, wide enough for subassembly layout, and topped with a replaceable surface. Add a vise, bench grinder, parts trays, and shadow-board storage for your most-used tools. Rolling carts are invaluable for keeping a project mobile and preventing the common problem of mixing fresh parts with dirty ones. Documentation extends beyond labels. Maintain a project log that tracks torque specs, machine shop work, ordered parts, finish choices, and wiring changes. This record protects resale value, supports reassembly accuracy, and helps diagnose issues months later. Good organization is not administrative overhead; it is part of the restoration process itself, especially when projects stretch across seasons or years.
Prioritize safety, cleanliness, and realistic budgeting
The ultimate restoration workshop is safe enough that you can work for years without preventable injuries or damage to the car. Fire safety starts with ABC and CO2 extinguishers placed near exits and welding zones, not buried behind shelves. Store flammable liquids in approved cabinets, keep oily rags in metal containers, and isolate battery charging from open solvent use. Personal protective equipment should include eye protection, hearing protection, gloves suited to the task, welding gear, and properly rated respirators for dust, paint, and chemical vapors. Housekeeping is part of safety. Dust collection, frequent sweeping, and dedicated metal scrap bins reduce slips, contamination, and puncture hazards. Cleanliness also directly improves restoration quality by keeping grit out of bearings, paint, and interior materials.
Budgeting requires honesty about your scope. A starter restoration workshop can be highly capable with used storage, new safety gear, strong hand tools, and selective outsourcing for machining or final paint. A more advanced workshop with lift, compressor system, welders, fabrication tools, and climate control may cost many thousands more, but it can save substantial labor across multiple projects. The best buying strategy is phased investment. Buy infrastructure and core tools first, then add equipment that removes the biggest bottleneck in your current work. Rent or borrow rarely used specialty tools, and outsource tasks that demand controlled environments or infrequent, high-skill processes. Build your workshop to support the standard you want for the car, not the image of a dream garage. Start with a plan, choose tools that match real restoration jobs, and create a shop where progress is safer, faster, and consistently better.
Frequently Asked Questions
What are the most important elements of a classic car restoration workshop?
The most important elements are layout, safety, lighting, power, ventilation, storage, and the right mix of tools for the kind of restoration work you plan to do. A great workshop is not simply a room filled with expensive equipment. It is a well-organized system that allows you to inspect, disassemble, label, repair, fabricate, refinish, reassemble, and maintain a classic car without constantly fighting clutter, poor visibility, or unsafe conditions.
Start with layout. You need enough room to walk around the vehicle, open doors, move parts carts, position jacks or a lift, and separate dirty work from clean assembly work. Good lighting is equally essential because restoration work depends on seeing imperfections in metal, paint, wiring, and trim. Combine bright overhead LED lighting with task lighting at benches and under-car areas. Reliable electrical service matters because compressors, welders, battery chargers, power tools, and lighting all place different demands on your system. In many shops, adding dedicated circuits and plenty of outlets is one of the smartest upgrades you can make.
Safety is non-negotiable. Fire extinguishers, first-aid supplies, proper chemical storage, ventilation for fumes and dust, and clear walkways should be considered foundational. Storage is another major factor. Restoration creates hundreds of small parts, fasteners, brackets, and trim pieces, so you need shelving, bins, labeled drawers, and protected storage for fragile or finished components. Finally, choose tools based on repeatable quality rather than impulse purchases. Solid hand tools, jacks and stands, measuring tools, air tools, welding equipment, sanding and grinding tools, and cleaning equipment will usually do more for productivity than flashy specialty gadgets you rarely use.
How much space do I need to build an effective restoration workshop?
The ideal amount of space depends on the scope of your projects, but in general, more room improves safety, efficiency, and quality. A basic home workshop can support restoration work in a standard two-car garage, but the space must be planned carefully. You need enough clearance not only for the car itself, but also for removed panels, engine hoists, rolling tool chests, workbenches, parts shelves, and the ability to move around the car comfortably from every angle.
As a practical rule, you should aim for enough space to keep at least one vehicle stationary while still maintaining access to a bench area, storage zone, and tool area. If you expect to remove doors, fenders, glass, suspension, or driveline components, space disappears quickly. Vertical storage becomes extremely valuable in smaller workshops. Wall-mounted cabinets, shelving, pegboards, and overhead storage can help preserve floor space, but heavy items should remain accessible and safely stored. If you have the option, dedicate separate zones for fabrication, teardown, and final assembly so dust, grinding debris, and overspray do not contaminate clean parts or finished surfaces.
Ceiling height also matters, especially if you plan to install a lift. A lift can dramatically improve underbody access and reduce strain, but it demands sufficient height, proper concrete thickness, and safe installation. Even if a full-size lift is not possible, you still need enough room for jacks, stands, creepers, and under-car lighting. Ultimately, the right workshop size is the one that lets you work methodically without stacking parts in unsafe places or constantly rearranging the shop just to complete the next step.
Which tools and equipment should I buy first for a classic car restoration workshop?
The best approach is to build your workshop around core tools that support frequent, high-value tasks. Start with quality hand tools: ratchets, sockets, wrenches, screwdrivers, pliers, hammers, pry tools, punches, and torque wrenches. These are used constantly during disassembly and reassembly, and buying dependable versions from the beginning usually saves money over time. Add measuring and inspection tools such as calipers, straightedges, feeler gauges, multimeters, test lights, and magnetic trays for small parts control.
Next, prioritize safe lifting and support equipment. A strong floor jack, high-quality jack stands, wheel chocks, and sturdy ramps are essential. If your budget and building allow it, a vehicle lift can be one of the most transformational investments you make. After that, equip your bench area with a heavy-duty workbench, vise, good lighting, and organized tool storage. These may seem basic, but they directly affect the accuracy and comfort of almost every repair.
Power and air tools should be chosen according to your workflow. An air compressor paired with impact tools, blow guns, and paint-related equipment can be extremely useful, but make sure the compressor is sized for your actual needs. Angle grinders, drills, sanders, polishers, and cutoff tools are staples for metal and body work. If fabrication or structural repair is part of your restoration plans, a welder, welding table, clamps, and metalworking tools become important early purchases. Cleaning equipment is often overlooked, yet parts washers, degreasers, wire wheels, shop vacuums, and pressure washers do a huge amount of daily work in a restoration environment.
It is wise to buy in stages. Begin with the tools that improve safety, accuracy, and routine productivity, then expand into specialized equipment based on the specific needs of your project. That approach creates a workshop that grows intelligently instead of becoming crowded with expensive tools that do not meaningfully improve results.
How should I set up lighting, power, and ventilation in a restoration workshop?
These three systems have an outsized effect on the quality of your work. Good lighting helps you spot surface waviness, corrosion, leaks, wiring faults, and paint defects before they become bigger problems. Power determines whether your equipment runs reliably and safely. Ventilation protects your health and reduces the buildup of dust, fumes, moisture, and heat. Together, they turn an ordinary garage into a workshop that supports serious restoration work.
For lighting, use a layered approach. Bright, even overhead LED fixtures should provide general illumination across the entire shop. Task lighting should then be added at benches, tool areas, and inspection stations. Portable work lights, magnetic lights, and under-hood lighting are invaluable for detailed repairs. Aim to minimize shadows, especially around the sides of the car, beneath the vehicle, and at the workbench. Light color also matters. Neutral to daylight-balanced lighting typically makes it easier to judge paint, metal condition, and wiring colors accurately.
For power, plan for more outlets than you think you need. Place them around the perimeter of the workshop and above bench height where practical, so you are not relying on extension cords across walkways. Dedicated circuits may be necessary for larger compressors, welders, heaters, paint equipment, or lifts. If you are building or upgrading the shop, consult a qualified electrician to ensure proper service capacity, breaker sizing, grounding, and outlet placement. Reliable power is not just about convenience; it is a safety issue as well.
Ventilation is especially important during sanding, welding, painting, solvent use, and engine testing. At minimum, you want airflow that helps remove fumes and airborne dust while keeping fresh air moving through the space. Exhaust fans, filtered air movement, dust collection, and localized extraction near welding or grinding areas can all improve conditions significantly. If painting is part of your process, additional containment and filtration measures are often necessary. A workshop that manages light, electricity, and airflow properly will feel more professional, produce better work, and remain much safer over the long term.
How do I keep a restoration workshop organized during a long classic car project?
Organization is one of the biggest predictors of whether a long restoration stays enjoyable and efficient or turns into a stalled, frustrating mess. Classic car projects generate an enormous number of parts, fasteners, subassemblies, and notes, and once those pieces become mixed, unlabeled, or damaged, you lose time and increase the risk of errors during reassembly. The best strategy is to create a repeatable system before major disassembly begins.
Start by dividing the workshop into defined zones: vehicle work area, bench area, parts cleaning area, fabrication area, storage area, and a protected space for finished or delicate components. Every removed part should have a destination. Use labeled bins, resealable bags, drawer organizers, and shelving units to separate components by system, such as front suspension, interior trim, brake hardware, engine accessories, or electrical parts. Label everything clearly, including the orientation or location of brackets, shims, clips, and fasteners. Taking photos before and during disassembly is equally important, as it creates a visual record that can save hours later.
Large parts should be stored so they are stable, protected, and easy to identify. Doors, hoods, bumpers, glass, and trim pieces can be scratched or bent quickly if they are leaned carelessly against walls or stacked without padding. Rolling carts are extremely helpful for keeping a specific subassembly together as you move through stages of inspection and repair. Many restorers also benefit from a notebook, whiteboard, or digital project tracker that records part numbers, missing items, measurements, torque specs, and next steps.
The key is consistency. If you return tools to the same place, label parts immediately, and clean up at the end of each work session




