Lighting can make or break a classic car display because the same vehicle that looks flat under a single ceiling bulb can look museum worthy when light reveals its paint depth, chrome detail, body lines, and interior character. In the context of classic car culture, a display setup means more than basic visibility. It includes layered lighting for presentation, safe task lighting for maintenance, ambient lighting for a garage lounge or man cave, and control systems that let owners shift the room from workshop to showcase. I have helped plan display garages where owners invested heavily in floors, signs, and storage, then realized the car still felt underwhelming until the lighting strategy matched the collection. That is why lighting ideas for classic car displays matter so much within garage and man cave design. Good lighting protects value, improves photographs, supports detailing, reduces eye strain, and turns a private collection into an experience. Whether you show one restored Mustang, a row of air cooled Porsches, or a memorabilia filled garage centered on a C10 pickup, the right plan starts with purpose: display, work, relax, or all three.
Start with a lighting plan built around the car, not the ceiling
The best classic car display lighting begins by studying how viewers will see the vehicle. In most garages, people enter from a side door or the main overhead door, so the first visual angle is usually front three quarter. That angle highlights hood contours, grille texture, wheel design, and windshield reflections. A good plan places illumination to support that view, then layers light for side profiles, rear details, and interior visibility. Instead of relying on one bright fixture in the middle of the room, divide the space into zones: overhead ambient light, vertical wall washing, accent lighting, task lighting, and decorative mood lighting. This layout produces depth and control.
Color temperature is a key decision. For classic car displays, I usually recommend a neutral white range around 4000K to 5000K for primary display lighting because it shows paint accurately and keeps chrome crisp. Warmer light around 2700K to 3000K can work in lounge areas, especially near leather seating, vintage signs, or wood cabinetry, but it often makes white paint look yellow and can dull blues and silvers. Equally important is Color Rendering Index. Choose fixtures with a CRI of 90 or higher so reds, blacks, metallics, and interior materials read correctly. A low CRI fixture may look bright on paper yet still make a meticulously restored Chevelle appear lifeless.
Brightness should be measured deliberately. General garage ambient lighting often lands near 30 to 50 foot candles, but display and detailing zones benefit from higher levels, especially around side panels where swirl marks or paint defects hide. Layering matters more than raw output. Diffused linear fixtures can reduce harsh hotspots on curved fenders, while controlled spotlights can isolate badges, engine bays, or a neon sign above the car. Dimmers are essential. They let a space transition from practical maintenance mode to evening presentation mode without changing fixtures. If this hub leads you deeper into garage layout, detailing zones, or memorabilia walls, remember that every design decision downstream works better when lighting is planned first.
Choose fixture types that flatter body lines and finishes
Not every fixture belongs in a classic car garage. Bare bulbs create distracting points of reflection on glossy paint. Cheap LED shop lights can flicker, produce uneven beam patterns, or shift color over time. The most reliable foundation is linear LED lighting with diffusers, mounted in rows that follow the room and vehicle layout. These fixtures create long, clean reflections across doors, quarter panels, and hoods, which is exactly what makes straight bodywork and polished paint stand out. In restoration and concours circles, straight reflected lines are a visual proof point. When the reflection bends, the eye notices.
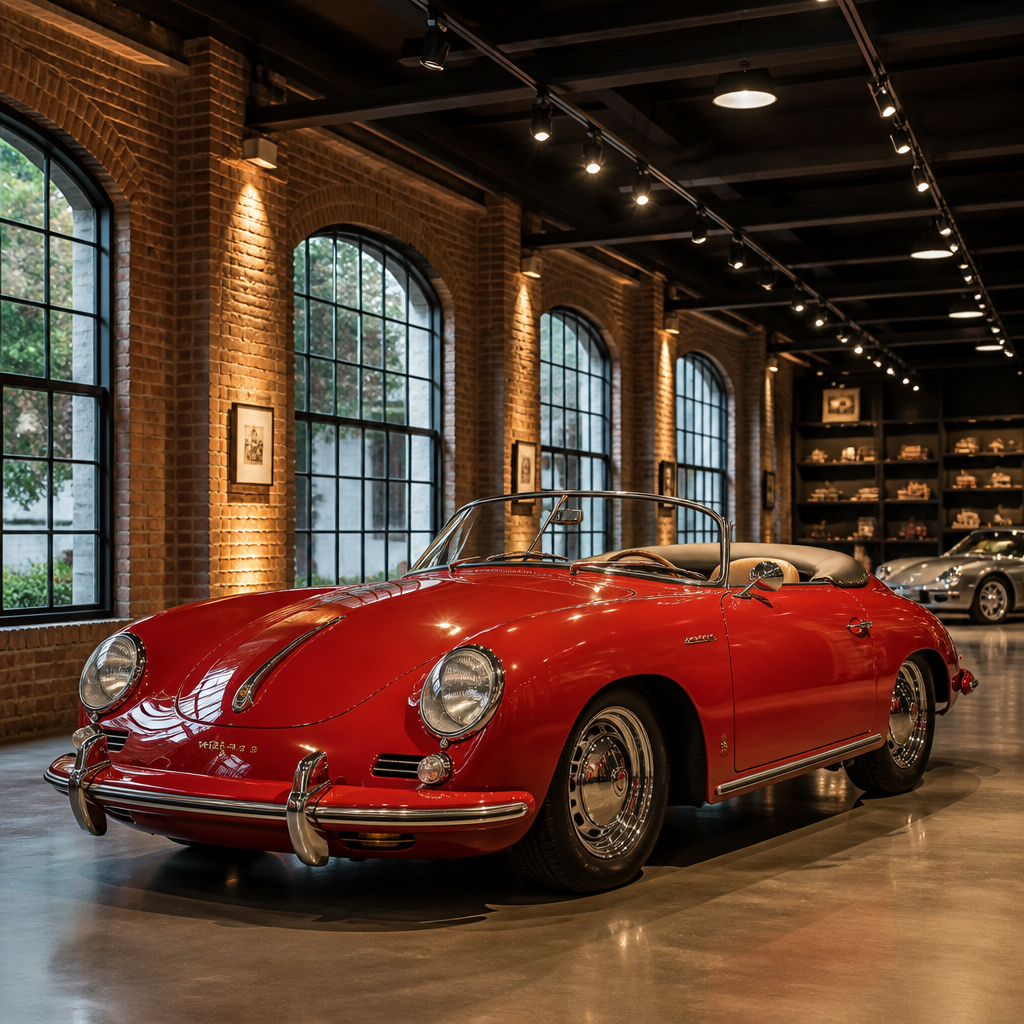
Recessed downlights can supplement linear fixtures, but they should not do all the work. Used alone, they create top-down pools that leave wheel faces, lower rockers, and interior details too dark. Track lighting is useful when the garage doubles as a collection gallery because heads can be aimed at wall art, license plate displays, trophy shelves, or a featured car on a turntable pad. Sconces or vertical light bars on side walls are especially effective because they add side illumination that reveals panel shape and reduces the cave effect common in long garages. For enclosed displays, toe-kick LED strips under cabinets or behind floating shelves add depth without stealing attention from the vehicle.
For owners deciding between common options, the practical differences are straightforward.
| Fixture type | Best use | Main advantage | Limitation |
|---|---|---|---|
| Linear LED with diffuser | Primary display and ambient lighting | Clean reflections on paint and chrome | Needs careful row spacing |
| Recessed downlights | Fill light and circulation paths | Clean ceiling appearance | Can create harsh top shadows alone |
| Track lighting | Accent on cars, art, and memorabilia | Aimable and flexible | Visible hardware may not suit every style |
| Wall sconces or vertical bars | Side panel illumination | Adds depth and reduces shadowing | Requires wall space and wiring planning |
| LED strips | Shelves, cabinets, and underglow accents | Subtle atmosphere and highlight control | Cheap strips often fail early |
One more rule matters: avoid visible glare from the normal standing viewpoint. If a person can see the diode source directly, they will notice the fixture more than the car. Use frosted lenses, louvers, or indirect placement whenever possible. The goal is to light the vehicle, not advertise the hardware.
Use layered lighting to move from workshop to man cave
A true garage and man cave hub should cover both function and atmosphere because most owners want one room to do several jobs. During the day, the garage may be used for washing, touch-up detailing, battery tender checks, or light mechanical work. At night, the same room might host friends for a game, a cars and coffee planning session, or quiet time with music and a drink. Layered lighting solves this by assigning each activity its own light level and fixture type. I typically group circuits into at least four zones: full ambient, task, display accent, and lounge mood.
Task lighting belongs over workbenches, tool walls, parts cleaning stations, and storage cabinets. Here, neutral to cooler light helps distinguish wire colors, fluid leaks, fastener markings, and polishing residue. Under-cabinet LEDs are excellent for this zone. Display accent lighting is narrower and more selective. It may illuminate a cowl induction hood, a period correct sign, a framed racing photo, or the engine bay when the hood is open during a gathering. Lounge mood lighting is softer and often warmer, with dimmable sconces, concealed strips behind shelves, or pendant lighting over a bar. By separating these layers, you preserve the serious look of a collector garage without making the room feel clinical.
Controls deserve as much attention as fixtures. Smart dimmers from Lutron Caseta, RadioRA, or similar systems let owners preset scenes such as Arrival, Detail, Entertain, and Night Check. A scene can raise vertical wall lighting, lower ceiling output, and activate cabinet accents in one tap. Motion sensors can be useful in storage bays and utility corners, but I avoid them in the main display area because they can interrupt the mood or switch on abruptly while people are seated. If your broader garage and man cave plan includes a bar, simulator, seating zone, or memorabilia wall, build lighting scenes around those destinations so the room feels intentional rather than overlit.
Prevent paint glare, reflection problems, and photography issues
Classic cars are unusually sensitive to bad lighting because they combine glossy paint, chrome, glass, polished trim, and curved sheet metal. Those surfaces amplify every mistake. The most common problem is glare: hard reflections from point source fixtures that create bright dots on fenders, windshields, and dashboards. Diffused fixtures, wider beam spreads, and side lighting all reduce this effect. Another issue is scalloping, where poorly spaced downlights create repetitive bright and dark bands along a wall or side panel. Linear fixtures aligned with the car tend to create smoother, more elegant reflections.
Black cars and very dark colors are the hardest to light well. They show dust instantly and reflect the room like a mirror. For black paint, even illumination is more important than extreme brightness. White cars have the opposite challenge: too much intensity can blow out details and make the shape look flat in photos. Metallic finishes benefit from directional accent light that wakes up the flake, but the beam must stay controlled to avoid hotspotting. Chrome bumpers, wire wheels, and polished valve covers can also bounce light directly into viewers’ eyes unless fixture placement is tested from typical standing positions.
If the garage will be photographed often for social media, auction documentation, or insurance records, lighting should support cameras as well as human eyes. High CRI LEDs with minimal flicker are essential because rolling bands and color shifts show up quickly on phone video. Keep mixed color temperatures under control. A 5000K display zone beside a 2700K sign wall can create strange skin tones and inconsistent paint color in images. For dramatic reveal photos, use dimmable ambient light and slightly brighter accents on the front corners of the car. That setup defines form without flattening it. A good display garage should let the car look excellent in person and through a lens, because today those images often shape how a collection is shared, documented, and remembered.
Match the lighting style to the garage theme and collection
The right lighting ideas for classic car displays should reinforce the identity of the collection. A 1950s Americana garage with porcelain signs, checkerboard flooring, and a Bel Air benefits from warmer decorative accents, period style sconces, and statement neon balanced by neutral display lighting on the car itself. An industrial loft style space with exposed block walls, steel shelving, and vintage race posters may suit black track heads, linear suspended fixtures, and targeted wall washes. A high end modern garage with epoxy floors and glass doors usually looks best with minimalist recessed channels, hidden LED strips, and precise, low glare beam control.
The cars themselves should guide the mood. Muscle cars often benefit from bolder contrast and stronger accenting around grilles, shaker hoods, and wheel arches. European classics with finer body detailing, such as a Jaguar E-Type or Mercedes SL, usually look better under softer, more even light that traces the curves. Trucks and off-road classics can handle a more rugged aesthetic, but even then, quality display light matters if you want paint, patina, and accessories to read clearly. Interiors deserve attention too. A convertible with the top down, a wood rim steering wheel, or a plaid seat insert can disappear unless a dedicated angle gives the cabin some presence.
Lighting also supports the non-car elements that complete classic car culture. Trophies, gas pumps, die-cast collections, framed brochures, racing helmets, and vintage tool chests all deserve selective highlighting. This is where a hub page connects naturally to future articles about memorabilia displays, bar design, wall décor, flooring, and storage. The principle stays constant: give the car visual priority, then use secondary lighting to tell the story around it. When the room is cohesive, visitors remember both the vehicle and the atmosphere that surrounds it.
Prioritize electrical safety, efficiency, and long term maintenance
Beautiful lighting fails if the installation is unreliable or unsafe. Garages combine dust, vibration, changing temperatures, and sometimes humidity, so fixture quality matters. Use products listed by recognized safety agencies and have new circuits, panel upgrades, or rewiring handled by a licensed electrician. If a garage includes detailing sinks, exterior wash bays, or beverage areas, GFCI protection should be planned correctly. LEDs are the standard choice because they run cooler, use less power than fluorescent or halogen options, and maintain output for years, but not all LEDs are equal. Look for strong driver quality, good thermal management, and manufacturer support.
Energy use is not just an operating cost issue. Lower heat output helps keep a display room more comfortable and reduces stress on stored materials such as vinyl signs, seat leather, and adhesives. Maintenance access also matters. Replacing a failed fixture over a lift or between ceiling-hung storage racks is harder than people expect, so durable fixtures and rational placement save trouble later. In my experience, owners rarely regret spending more on reliable controls and commercial-grade fixtures, but they often regret bargain products that discolor, buzz, or die in sections after a year.
Plan for growth. Many collections expand from one car to two, or from a single bay to a full themed space with audio, cabinets, and display cases. Extra electrical capacity, spare control zones, and flexible accent fixtures make future upgrades easier. The best garage and man cave lighting is not a one season decoration. It is infrastructure that supports the way you store, enjoy, document, and share classic cars over time.
Lighting ideas for classic car displays work best when they combine accuracy, drama, flexibility, and safety in one coordinated plan. Start by deciding how the car should be seen, then build layers with high CRI fixtures, neutral primary light, controlled accents, and dimmable scenes. Use linear lighting for smooth reflections, side illumination for body shape, and selective highlights for memorabilia and architectural features. Avoid glare, test reflections from normal viewpoints, and remember that a garage meant for both maintenance and entertaining needs separate task and mood zones. Most of all, let the collection drive the design. A well lit display garage does more than brighten a room. It honors restoration work, improves daily use, and turns your man cave into a space people remember. If you are planning a classic car garage upgrade, map your zones first and choose lighting before you buy décor, cabinetry, or seating.
Frequently Asked Questions
What type of lighting works best for a classic car display?
The best lighting for a classic car display is usually a layered combination of ambient, accent, and task lighting rather than one single fixture trying to do everything. Ambient lighting gives the room overall brightness, accent lighting highlights the vehicle’s most impressive features, and task lighting supports detailing, inspection, and light maintenance. When these layers work together, the car looks intentional and refined instead of simply parked under a bright ceiling light.
For most displays, high-quality LED lighting is the preferred choice because it offers strong output, good energy efficiency, long life, and far more control than older lighting technologies. Linear ceiling fixtures, recessed lights, track lighting, and wall washers can all play useful roles depending on the size and layout of the space. A classic car often benefits from broad, even illumination that reveals the shape of the fenders, hood, roofline, and paint finish without creating harsh hotspots. Accent lights can then be aimed at chrome, wheels, grille details, badges, or engine bay features to bring out the craftsmanship that enthusiasts want people to notice.
The real goal is balance. A display should feel bright enough to showcase the car’s lines and finish, but not so intense that reflections become distracting or the paint appears washed out. Thoughtful placement, proper beam spread, and adjustable controls matter just as much as fixture brightness. In a well-designed setup, the lighting does not compete with the classic car. It frames it, flatters it, and makes every detail easier to appreciate.
How can lighting make a classic car’s paint, chrome, and body lines stand out more?
Lighting reveals form, texture, and finish, which is exactly why it has such a dramatic effect on classic cars. Deep paint, polished chrome, and sculpted body panels all respond differently to light, so the key is using angles and fixture types that show those surfaces at their best. A single overhead bulb tends to flatten everything, while layered and directional lighting creates depth, contrast, and visual movement across the vehicle.
To emphasize paint depth, use even overhead lighting combined with side lighting that gently skims the body. This helps the curves and transitions in the sheet metal become more visible, especially on vehicles with pronounced fenders, long hoods, and flowing beltlines. If the light is too narrow or too direct, it can create glare and overpower the finish. Wider beam spreads and diffused fixtures often work better for showing paint quality in a flattering way. For metallic or high-gloss finishes, the reflections themselves become part of the presentation, so controlling what is reflected in the paint is important too.
Chrome and polished trim usually benefit from focused accent lighting, but moderation is important. Too much direct light can create blinding sparkle and uneven visual hotspots. Well-aimed accent fixtures can make bumpers, mirror housings, wheel lips, and grille elements pop without becoming visually harsh. Body lines are best highlighted when light travels across them rather than hitting them head-on. That grazing effect defines edges, contours, and panel transitions. In other words, great display lighting does not just brighten the car. It sculpts it visually so viewers can see what makes the vehicle special.
What color temperature is best for lighting a classic car display?
For most classic car displays, a color temperature in the warm-to-neutral white range tends to work best, typically around 3000K to 4000K. This range usually provides enough clarity to show details while still keeping the space inviting and visually rich. Warmer light can make a garage lounge or man cave feel more comfortable and upscale, while a more neutral white often helps with accurate viewing of paint, upholstery, trim, and finish quality. The right choice depends on whether the display is intended to feel more like a showroom, a workshop, or a social space that blends both.
If the goal is pure presentation, many owners prefer something around 3000K to 3500K because it flatters classic materials such as leather, wood accents, chrome, and older paint colors. It gives the room a polished, premium atmosphere. If the display area also doubles as a maintenance and detailing space, moving closer to 4000K can be useful because it offers a cleaner, more neutral look that helps reveal dust, swirl marks, imperfections, and mechanical details more clearly. Extremely cool temperatures, such as 5000K and above, can work in some task-heavy spaces, but they often feel clinical and can make a vintage display area lose some of its warmth and character.
Beyond color temperature, color rendering is equally important. A high CRI LED, ideally 90 or above, helps paint colors, interior materials, and metal finishes look more accurate and vibrant. That is especially important with classic cars because subtle tones, period-correct finishes, and restoration details can be lost under poor-quality light. If possible, using dimmable or tunable lighting gives you the best of both worlds: brighter, more neutral light for inspection and warmer tones for relaxed display mode.
How should lighting be arranged in a garage or showroom to display a classic car properly?
A good layout starts with understanding that the car should be lit from multiple directions, not just from directly above. Overhead lighting is essential for general visibility, but if all the illumination comes from the ceiling centerline, the vehicle can look flat and shadowy along the sides. A better approach is to create an even base layer across the room and then add lighting that defines the vehicle from the front, sides, and sometimes behind. This gives the display a more complete, intentional look.
In practical terms, many setups benefit from evenly spaced ceiling fixtures that reduce dark patches and create a consistent wash of light around the vehicle. Side lighting from walls or vertical fixtures can be especially effective because it reveals doors, quarter panels, wheel arches, and lower body contours that overhead lights often miss. Accent fixtures can then be directed toward the front fascia, hood ornament area, engine bay, wheels, or a feature wall behind the car. If the car is parked in front of memorabilia, signage, cabinetry, or display shelves, lighting those background elements carefully can make the entire space feel curated rather than cluttered.
It is also smart to think in scenes rather than a single on-off setup. One lighting arrangement might be ideal for entertaining guests, another for photographing the car, and another for mechanical work. Dimmers, zones, and smart controls make this easy. A classic car display space often serves several purposes, so the best arrangement supports all of them without compromising the vehicle’s appearance. When planned well, the room feels flexible, dramatic, and highly functional at the same time.
Are smart lighting controls worth adding to a classic car display space?
Yes, in most cases smart lighting controls are absolutely worth adding because they make the display far more adaptable and enjoyable to use. Classic car spaces often serve multiple roles: display area, workshop, lounge, photo backdrop, and gathering place. A fixed lighting setup may handle one of those functions well, but smart controls let the room shift instantly depending on what you are doing. That convenience alone can dramatically improve the day-to-day experience of owning and showing off the vehicle.
With smart controls, you can create preset scenes for different uses. For example, one scene might bring up all general and task lighting for cleaning or inspection. Another might dim the ambient fixtures while keeping accent lights on the car itself for a dramatic showroom effect. A third could warm the space for social events, conversations, or evening relaxation in a garage lounge or man cave setting. Some systems also allow scheduling, voice control, app-based adjustments, and integration with music, security, or motorized shades, which can make the entire environment feel more polished and personalized.
From a design standpoint, smart controls also solve a common problem: the same light that is perfect for polishing chrome may be too bright for enjoying the car casually. Instead of compromising, you get flexibility. The key is choosing a system that is reliable, easy to operate, and divided into logical zones such as overhead ambient lights, accent fixtures, wall lighting, and task lights. When that level of control is in place, the room becomes more than a storage area. It becomes a true display environment tailored to the car, the owner, and the moment.